Bulk Schedule Upload
Purpose
Import multiple schedule events simultaneously using an Excel template, enabling efficient creation of multiple events without manually entering each one individually.
Access
Navigate to: /manage/bulk/schedules or Bulk → Schedules Upload
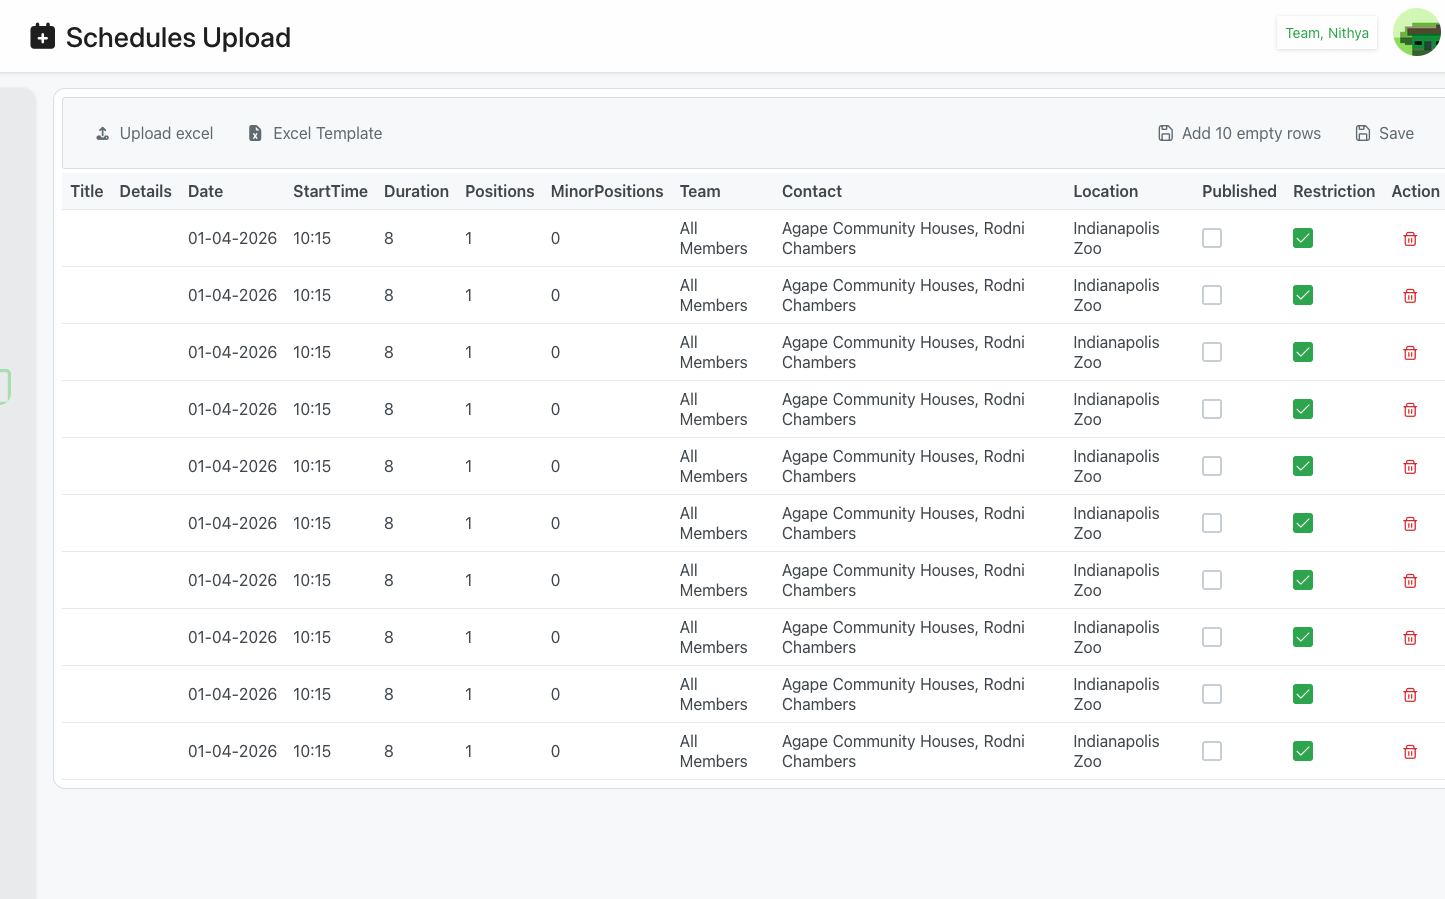
Screenshot
Description
The Bulk Schedule Upload feature allows administrators to create multiple schedule events at once by uploading an Excel file with event details. This is particularly useful for setting up recurring events, tournaments, or full season schedules efficiently.
Key Features
Mass Event Creation
- Upload multiple events in one operation
- Standardized template ensures data consistency
- Validates data before final submission
- Preview uploaded events before saving
Excel Template Based
- Two-sheet template with documentation and data entry
- Clear column specifications and requirements
- Sample data format guidance
- Optional fields with smart defaults
Flexible Event Configuration
- Event details and descriptions
- Date, time, and duration settings
- Position requirements (regular and under-age)
- Team assignments
- Contact information
- Location specification
- Publish and restriction flags
Page Header
Navigation
- Icon: 📅 Calendar icon
- Title: "Schedules Upload"
- User Info: Current user display (e.g., "Team, Nithya")
Action Bar
📤 Upload excel
- Position: Top-left
- Color: Gray/outlined button
- Icon: Upload arrow icon
- Action: Opens file browser to select Excel file
- Purpose: Upload completed Excel template
- Accepts: .xlsx, .xls file formats
- Result: Processes file and displays events in table
📄 Excel Template
- Position: Top-left, next to Upload excel
- Color: Gray/outlined button
- Icon: Document icon
- Action: Downloads Excel template file
- File: Typically named "bulk_schedules.xls" or similar
- Purpose: Get standardized template for data entry
- Use: Always download template before creating upload file
➕ Add 10 empty rows
- Position: Top-right
- Color: Gray/outlined button with icon
- Icon: Plus icon with document
- Action: Adds 10 blank rows to current table
- Purpose: Manually add events or expand imported data
- Use: For additional entries after upload
💾 Save
- Position: Top-right, rightmost button
- Color: Gray/outlined button
- Action: Save all validated events to system
- Requirements: Events must pass validation
- Result: Creates all schedule events in system
Events Table
The table displays all uploaded events with columns for review and editing:
Column Headers
Title
- Event name/title
- Example: Event title
- Required field
- Editable inline
Details
- Event description and information
- Example: "Event details and information for the members"
- Optional field
- Can be lengthy text
- Editable inline
Date
- Event date
- Format: MM-DD-YYYY (e.g., "01-04-2026")
- Required field
- Editable inline
StartTime
- Event start time
- Format: HH:MM (24-hour, e.g., "10:15")
- Optional (defaults based on settings)
- Editable inline
Duration
- Event duration in hours
- Example: "8" (hours)
- Optional (defaults based on settings)
- Editable inline
- Numeric value
Positions
- Number of positions/slots needed
- Example: "1"
- Optional (defaults to 1)
- Numeric value
- Editable inline
MinorPositions
- Number of under-age positions
- Example: "0"
- Optional (defaults to 0)
- Numeric value
- Editable inline
Team
- Team assignment
- Example: "All Members"
- Optional (defaults to all teams)
- Must be exact team name from system
- Editable via dropdown
Contact
- Contact person(s) for event
- Format: "LastName, FirstName" or full name
- Example: "Agape Community Houses, Rodni Chambers"
- Optional (defaults to uploader)
- Can be updated after upload
- Editable inline
Location
- Event location
- Example: "Indianapolis Zoo"
- Optional field
- Must match system location name exactly
- Can be set after upload
- Editable via dropdown
Published
- Publish status checkbox
- Checked (✅): Event visible to members
- Unchecked (☐): Event not published
- Optional (defaults to No)
- Toggle inline
Restriction
- Access restriction checkbox
- Checked (✅): Restricted access
- Unchecked (☐): No restriction
- Optional (defaults to Yes based on screenshot)
- Toggle inline
Action
- Delete Icon (🗑️): Remove event from upload
- Red trash icon
- Click to remove row
- Only affects current upload, not saved events
Table Features
Inline Editing
- Most fields editable directly in table
- Click field to edit
- Changes reflected immediately
- Validation on edit
Scrolling
- Horizontal scroll for all columns
- Vertical scroll for many events
- Fixed header row
Row Management
- Add rows with "Add 10 empty rows" button
- Delete rows with trash icon
- Reorder not supported (use Excel)
Excel Template Structure
Template Sheets
Documentation Sheet
- Tab Name: "Documentation"
- Title: "Bulk Schedule Upload"
- Instruction: "For optional values, leave blank if not needed."
- Purpose: Column specifications and guidance
- Contents: Reference table with column details
Data Sheet
- Tab Name: "Data" (main sheet)
- Purpose: Where events are entered
- Layout: One row per event
- Column Order: Title, Details, Date, StartTime, Duration, Positions, MinorPositions, Team, Contact, Location, Published, Restriction
Column Specifications
From the Documentation sheet:
| Column | Required | Sample Data for format |
|---|---|---|
| Title | Yes | Event Name |
| Details | Optional | Event details and information for the members |
| Date | Yes | 01/20/2025 |
| StartTime | Optional - Defaults to Start time based on the settings | 14:30 |
| Duration | Optional - Defaults to duration based on settings | 3.5 |
| Positions | Optional - Defaults to 1 | 10 |
| Under Age Positions | Optional - Defaults to 0 | 10 |
| Team | Optional - Defaults to all teams. This should be exact Name as in the system | TeamName |
| Contact | Optional - Defaults to Uploaded. This should be the exact login name as in the system. You can set this after upload before submission | LastName, FirstName |
| Location | Optional - This should be exact name as in the system. You can set this after upload before submission | Location Name |
| Publish | Optional - Defaults to No | Yes |
| Restrict | Optional - Defaults to Yes | No |
Note: For optional values, leave blank if not needed.
Data Entry Guidelines
Title Field
- Required: Yes
- Format: Plain text
- Example: "Weekend Shift", "Tournament Game 1"
- Best Practice: Clear, descriptive event names
Details Field
- Required: Optional
- Format: Plain text (longer descriptions allowed)
- Example: "Event details and information for the members"
- Purpose: Provide context, instructions, or notes
- Best Practice: Include relevant details members need to know
Date Field
- Required: Yes
- Format: MM/DD/YYYY (e.g., "01/20/2025")
- Example: "01/04/2026"
- Validation: Must be valid date
- Best Practice: Use consistent date format throughout
StartTime Field
- Required: Optional
- Format: HH:MM (24-hour time, e.g., "14:30")
- Default: Uses system default start time setting
- Example: "10:15"
- Best Practice: Specify when different from default
Duration Field
- Required: Optional
- Format: Numeric (hours)
- Default: Uses system default duration setting
- Example: "3.5", "8"
- Best Practice: Use decimal for partial hours (3.5 = 3.5 hours)
Positions Field
- Required: Optional
- Format: Integer
- Default: 1
- Example: "10", "1"
- Purpose: Number of regular positions needed
Under Age Positions Field
- Required: Optional
- Format: Integer
- Default: 0
- Example: "10", "0"
- Purpose: Number of positions for minors/under-age workers
Team Field
- Required: Optional
- Format: Exact team name from system
- Default: All teams
- Example: "TeamName", "Referees Team"
- Important: Must match team name exactly as in system
- Can Update: Can be set/changed after upload
Contact Field
- Required: Optional
- Format: Login name or "LastName, FirstName"
- Default: Uploader's name
- Example: "LastName, FirstName", "Agape Community Houses, Rodni Chambers"
- Important: Must be exact login name from system
- Can Update: Can be set/changed after upload before submission
Location Field
- Required: Optional
- Format: Exact location name from system
- Example: "Location Name", "Indianapolis Zoo"
- Important: Must match location name exactly as in system
- Can Update: Can be set/changed after upload before submission
Publish Field
- Required: Optional
- Format: "Yes" or "No"
- Default: No
- Example: "Yes"
- Purpose: Control event visibility to members
Restrict Field
- Required: Optional
- Format: "Yes" or "No"
- Default: Yes
- Example: "No"
- Purpose: Control access restrictions
Upload Process
Step-by-Step
1. Download Template
- Navigate to Schedules Upload page
- Click Excel Template button
- Save template file to computer
- Open in Microsoft Excel, Google Sheets, or LibreOffice
2. Review Template
- Open template file
- Review Documentation sheet:
- Column requirements
- Sample data formats
- Optional vs required fields
- Default values
- Switch to Data sheet
3. Prepare Event Data
- Work in Data sheet (not Documentation)
- Enter one event per row starting at row 2
- Fill required fields:
- Title (event name)
- Date (MM/DD/YYYY format)
- Fill optional fields as needed:
- Details for event description
- StartTime if different from default
- Duration if different from default
- Positions for number of slots
- Under Age Positions if needed
- Team if specific team (leave blank for all)
- Contact if specific person
- Location name
- Publish (Yes/No)
- Restrict (Yes/No)
- Use consistent formatting
- Review all entries for accuracy
- Save file as .xlsx
4. Upload File
- Return to Schedules Upload page
- Click Upload excel button
- Browse to saved Excel file
- Select file and click Open
- Wait for file to process
- Events display in table
5. Review Uploaded Events
- Examine all events in table
- Verify data imported correctly
- Check dates, times, and details
- Review position counts
- Verify team assignments
- Check location assignments
- Verify publish/restrict flags
6. Edit if Needed
- Click any field to edit inline
- Use dropdowns for Team and Location
- Toggle checkboxes for Published/Restriction
- Add more rows with "Add 10 empty rows" if needed
- Delete unwanted events with trash icon
- Make all necessary corrections
7. Save Events
- Ensure all required fields filled
- Verify data accuracy
- Click Save button
- Wait for processing
- Events created in system
- Success confirmation shown
Use Cases
Season Schedule Creation
Scenario: Create entire season schedule at once
Process:
- Download Excel template
- Plan season events in spreadsheet
- Enter all events:
- Event titles (e.g., "Week 1 Game", "Week 2 Game")
- Dates for each event
- Times and durations
- Positions needed for each
- Team assignments
- Locations
- Review in Excel for accuracy
- Upload file
- Review in table
- Make any final adjustments
- Save all events
- Full season schedule created instantly
Recurring Events Setup
Scenario: Create weekly recurring events for a month
Process:
- Download template
- Create first event with details
- Copy row and adjust date for each week
- Keep same time, duration, positions
- Same team, location, contact
- Upload file with 4-5 events
- Review and save
- Recurring schedule established
Tournament Schedule
Scenario: Set up multi-day tournament
Process:
- Download template
- Plan tournament structure
- Enter all games/matches:
- Day 1 games
- Day 2 games
- Finals
- Different times for each
- Different position needs
- Specific locations for each court/field
- Upload complete tournament schedule
- Adjust any details
- Publish all at once
Multi-Location Events
Scenario: Events across multiple venues
Process:
- Gather event information for all locations
- Download template
- Enter events with specific locations:
- Stadium A events
- Stadium B events
- Practice field events
- Ensure location names match system exactly
- Upload file
- Verify location assignments in dropdown
- Correct any mismatches
- Save events
Validation and Error Handling
Pre-Save Validation
System Checks:
- Required fields (Title, Date) are filled
- Date format is valid
- StartTime format is valid (if provided)
- Duration is numeric (if provided)
- Positions and MinorPositions are numeric
- Team names match system teams
- Location names match system locations
- Publish/Restrict values are valid
Error Display:
- Invalid fields may be highlighted
- Error messages shown for issues
- Row-specific error indicators
- Cannot save until errors resolved
Common Errors
Date Format Errors
- Problem: Date not recognized
- Cause: Wrong format (e.g., "Jan 20, 2025" instead of "01/20/2025")
- Solution: Use MM/DD/YYYY format exactly
Team Name Mismatch
- Problem: Team not found
- Cause: Team name doesn't match system
- Solution:
- Leave blank to default to all teams
- Use exact team name from system
- Set via dropdown after upload
Location Name Mismatch
- Problem: Location not recognized
- Cause: Location name doesn't match system
- Solution:
- Leave blank and set after upload
- Use exact location name from system
- Select from dropdown after upload
Time Format Errors
- Problem: StartTime invalid
- Cause: Wrong format (e.g., "2:30 PM" instead of "14:30")
- Solution: Use 24-hour HH:MM format
Missing Required Fields
- Problem: Cannot save event
- Cause: Title or Date missing
- Solution: Fill all required fields for each event
Best Practices
Template Preparation
Planning
- Plan events in advance before entering data
- Gather all necessary information first
- Verify team and location names before entering
- Confirm dates and times
Data Entry
- Use consistent date format throughout
- Use 24-hour time format
- Be specific with event titles
- Provide detailed descriptions
- Double-check position counts
Quality Control
- Review all entries before upload
- Check for typos and errors
- Verify dates are correct
- Ensure team names are exact
- Confirm locations match system
Upload Process
File Management
- Save template with descriptive name
- Keep backup of original file
- Version control for multiple uploads
- Don't modify column headers
Review
- Always review after upload
- Check random sample of events
- Verify dates imported correctly
- Confirm times and durations
- Check position counts
Editing
- Use inline editing for small changes
- Re-upload for major corrections
- Test team/location dropdowns
- Verify publish/restrict settings
After Upload
Verification
- Spot-check several events
- Verify in main schedule view
- Confirm members can see published events
- Check that restrictions work correctly
Communication
- Notify teams of new events
- Announce schedule availability
- Provide context if needed
- Follow up on any issues
Troubleshooting
Cannot Upload File
Problem: Upload button doesn't work or file rejected
Solutions:
- Verify file is .xlsx or .xls format
- Check file isn't corrupted
- Ensure file not too large
- Try re-saving in Excel
- Use different browser
No Events Show After Upload
Problem: Table empty after file upload
Solutions:
- Verify data is in Data sheet, not Documentation
- Check column headers match exactly
- Ensure data starts in row 2
- Verify at least Title and Date filled
- Re-download template and try again
Some Events Won't Save
Problem: Only partial events save
Solutions:
- Check for validation errors
- Review highlighted fields
- Ensure required fields filled
- Verify date/time formats
- Check team/location names
- Fix errors and try saving again
Dates Import Incorrectly
Problem: Dates show wrong values
Solutions:
- Use MM/DD/YYYY format consistently
- Format date cells as Date in Excel
- Check Excel regional settings
- Enter dates as text if needed
- Manually correct in table after upload
Team/Location Not Found
Problem: Team or location not recognized
Solutions:
- Leave field blank in Excel
- Set using dropdown after upload
- Verify exact name spelling
- Check name exists in system
- Contact administrator if missing
Related Features
- Bulk Notifications - Send notifications to multiple teams
- Schedule Management - Individual schedule creation
- Teams Management - Manage team assignments
- Locations - Manage venue locations
Tips
- Download Fresh Template: Always use downloaded template for each upload
- Required Fields: Only Title and Date are required
- Smart Defaults: System uses defaults for optional fields
- Date Format: Use MM/DD/YYYY consistently (e.g., "01/20/2025")
- Time Format: Use 24-hour HH:MM format (e.g., "14:30")
- Team Names: Must match system exactly or leave blank
- Location Names: Must match system exactly or set after upload
- Contact Assignment: Can be set after upload before submission
- Add Rows: Use "Add 10 empty rows" for manual additions
- Inline Editing: Most fields editable directly in table
- Delete Freely: Remove unwanted events with trash icon before saving
- Review Before Save: Always review uploaded data before clicking Save
- Documentation Sheet: Reference for column specifications
- Bulk Efficiency: Import entire season or tournament at once