Announcements
Purpose
Create and manage organization-wide announcements that display as a banner marquee at the top of all pages throughout the application. Announcements are visible to all users until closed or expired.
Access
Navigate to: /organize/announcements or Organize → Announcements
Screenshots

Description
The Announcements feature allows administrators to create important messages that display prominently as a banner at the top of every page in the application. These announcements appear as a marquee-style banner that all users can see, making them perfect for organization-wide communications, important updates, system maintenance notices, or urgent information.
Key Features
Banner Display
- Displays at top of all pages
- Marquee-style presentation
- Visible to all users
- Closeable by users (X button)
- Persistent across page navigation
Announcement Management
- Create new announcements
- Set display mode (Until Closed, Always)
- Configure start and end dates
- Edit existing announcements
- Search and filter announcements
Display Modes
- Until Closed: Shows until end date or user closes banner
- Always: Shows continuously regardless of user actions
Page Structure
Header
- Icon: 📢 Megaphone/announcement icon
- Title: "Announcements"
- Organization: Current organization (e.g., "Team, Nithya")
- User Avatar: Profile picture in top-right
Action Toolbar
➕ Create Button
- Position: Top-left
- Color: Green
- Icon: Plus icon
- Label: "Create"
- Action: Opens New Announcement form
- Purpose: Add new organization-wide announcement
Search Box
- Position: Top-right
- Icon: 🔍 Magnifying glass
- Placeholder: "Search..."
- Function: Filter announcements by title
- Real-time: Updates table as you type
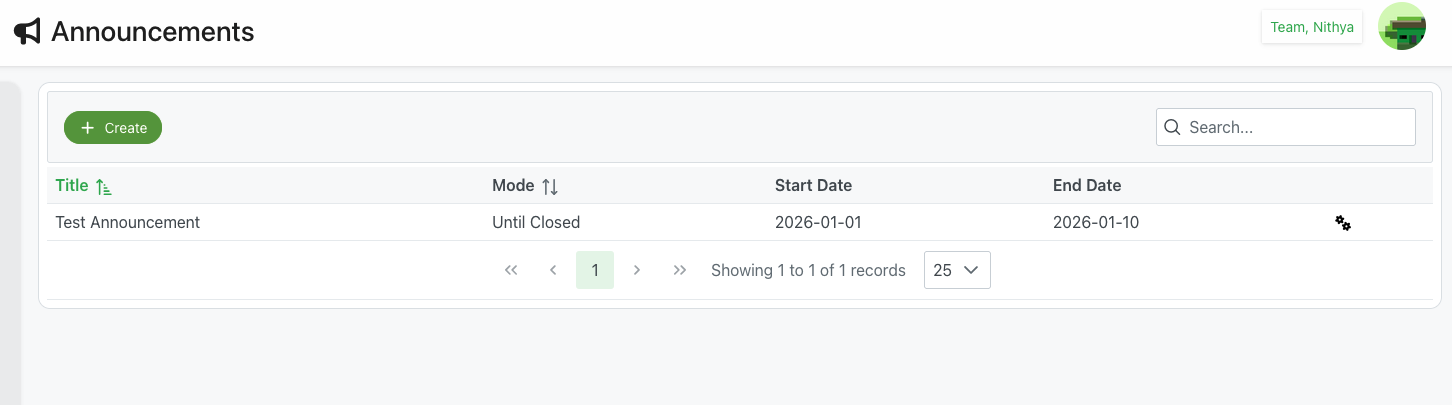
Announcements Table
Column Headers
Title
- Header: "Title"
- Sort Icon: ↕️ Up/down arrows
- Content: Announcement title
- Example: "Test Announcement"
- Sortable: Click header to sort alphabetically
- Searchable: Filterable via search box
Mode
- Header: "Mode"
- Sort Icon: ↕️ Up/down arrows
- Values:
- Until Closed: Shows until end date or user closes
- Always: Shows continuously
- Sortable: Sort by mode type
- Purpose: Control announcement persistence
Start Date
- Header: "Start Date"
- Content: Date announcement begins displaying
- Format: YYYY-MM-DD (e.g., "2026-01-01")
- Purpose: Schedule when announcement becomes visible
End Date
- Header: "End Date"
- Content: Date announcement stops displaying
- Format: YYYY-MM-DD (e.g., "2026-01-10")
- Purpose: Schedule when announcement expires
Actions
- Icon: ⚙️ Settings/gear icon or similar
- Options:
- Edit announcement
- Delete announcement
- View details
Table Features
Pagination
- Controls: ⏮ First, ◀ Previous, Page Number, ▶ Next, ⏭ Last
- Current Page: Highlighted (e.g., "1")
- Info: "Showing 1 to 1 of 1 records"
- Page Size: Dropdown showing "25"
- Options: Typically 10, 25, 50, 100 records per page
Empty State
- Message: "No announcements available to list"
- Shown: When no announcements exist or match search
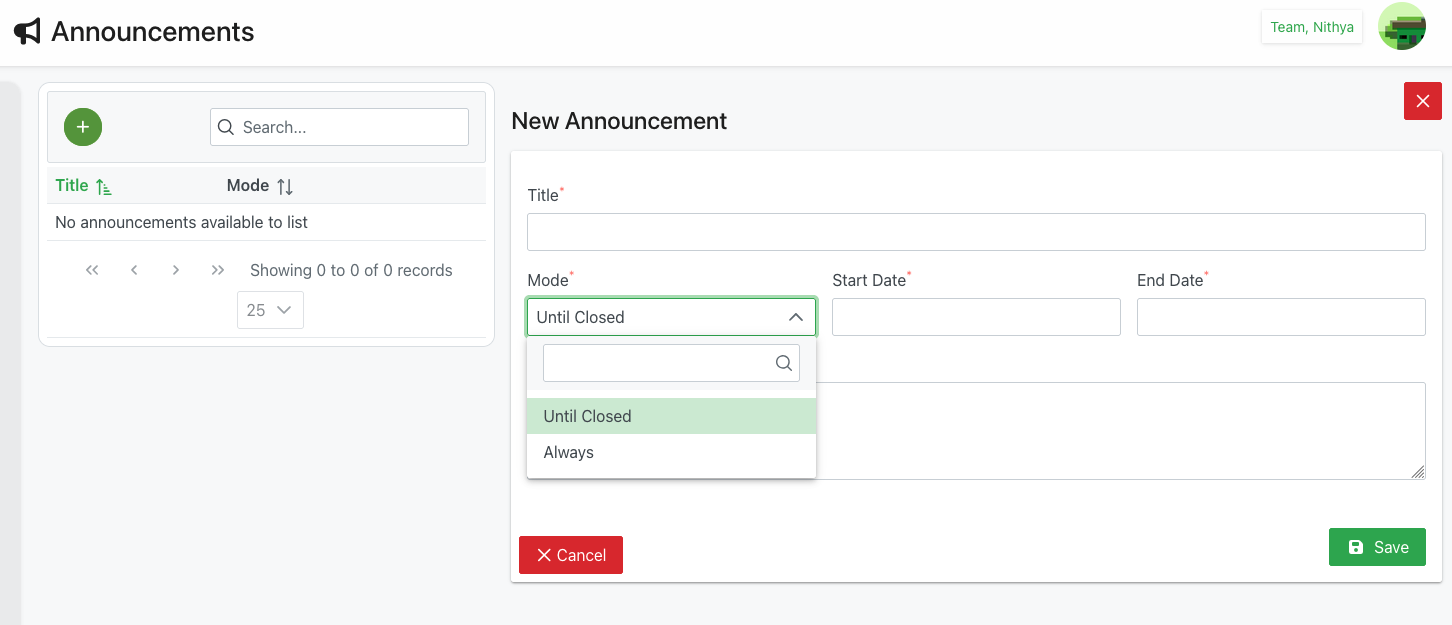
New Announcement Form
Form Header
- Title: "New Announcement"
- Close Button: Red X icon in top-right corner
- Purpose: Create organization-wide announcement
Form Fields
Title (Required)
- Label: "Title" with red asterisk
- Type: Text input
- Required: Yes
- Purpose: Short headline for announcement
- Display: Shows in announcements list
- Example: "Test Announcement"
Mode (Required)
- Label: "Mode" with red asterisk
- Type: Dropdown select with search
- Required: Yes
- Options:
- Until Closed: Displays until end date or user closes banner
- Always: Displays continuously, cannot be closed by user
- Default: "Until Closed" (shown highlighted in green)
- Search: Dropdown includes search box for filtering
- Purpose: Control announcement persistence behavior
Start Date (Required)
- Label: "Start Date" with red asterisk
- Type: Date picker
- Required: Yes
- Format: YYYY-MM-DD
- Purpose: When announcement begins displaying
- Example: "2026-01-01"
End Date (Required)
- Label: "End Date" with red asterisk
- Type: Date picker
- Required: Yes
- Format: YYYY-MM-DD
- Purpose: When announcement stops displaying
- Example: "2026-01-10"
- Validation: Must be after Start Date
Announcement Content
- Type: Large multiline text area
- Height: Approximately 10-12 lines
- Purpose: Full announcement message text
- Display: Shows in banner marquee on all pages
- Format: Plain text
- Optional: Appears not to have asterisk (check if required)
Action Buttons
❌ Cancel Button
- Position: Bottom-left
- Color: Red background
- Icon: X icon
- Label: "Cancel"
- Action: Close form without saving
- Result: Returns to announcements list
💾 Save Button
- Position: Bottom-right
- Color: Green background
- Icon: Save/disk icon
- Label: "Save"
- Action: Save announcement
- Validation: Checks all required fields
- Result:
- Creates announcement
- Closes form
- Returns to list
- Announcement begins displaying if within date range
Announcement Display Banner
Banner Appearance
- Position: Top of every page
- Background: Light blue color
- Width: Full width of page
- Style: Marquee/banner presentation
Banner Content
- Text: Full announcement message
- Example: "This is an org announcement and all users can see this till its closi..." (truncated if long)
- Visibility: All users can see
- Pages: Displays on all pages throughout application
Close Button
- Icon: ❌ X icon
- Position: Right side of banner
- Action: Closes/dismisses banner
- Availability: Only for "Until Closed" mode
- Behavior:
- User-specific (closes for that user only)
- Does not affect other users
- May not reappear for that user until next announcement
Creating an Announcement
Step-by-Step Process
1. Open Create Form
- Navigate to Announcements page
- Click green Create button
- New Announcement form opens
2. Enter Title
- Click in Title field
- Type short, clear headline
- Keep concise (displays in table)
- Example: "System Maintenance Tonight"
3. Select Mode
- Click Mode dropdown
- Choose display behavior:
- Until Closed: User can dismiss (recommended for most announcements)
- Always: Cannot be dismissed (use for critical information)
- Selection highlights in green
4. Set Start Date
- Click Start Date field
- Use date picker to select
- Choose when announcement should begin displaying
- Can be current date or future date
5. Set End Date
- Click End Date field
- Use date picker to select
- Choose when announcement should stop displaying
- Must be after Start Date
- Announcement automatically expires at end date
6. Write Announcement Content
- Click in large text area
- Type full announcement message
- This text displays in banner on all pages
- Be clear and concise
- Include any necessary details or instructions
7. Save Announcement
- Review all information
- Ensure required fields filled:
- Title
- Mode
- Start Date
- End Date
- Announcement content (if required)
- Click Save button
- Form closes
- Announcement appears in list
- If current date is within range, banner displays immediately
Editing an Announcement
Access Edit Form
- Find announcement in table
- Click settings/gear icon in Actions column
- Edit form opens with current information
Edit Process
- Update any fields as needed
- Change dates to extend or shorten display period
- Modify mode if needed
- Update announcement text
- Click Save button
- Changes apply immediately
- Active banner updates if currently displaying
Use Cases
System Maintenance Notice
Scenario: Scheduled maintenance tonight
Process:
- Create announcement
- Title: "System Maintenance Tonight"
- Mode: "Until Closed"
- Start Date: Today
- End Date: Tomorrow
- Content: "System will be unavailable from 11 PM to 1 AM for scheduled maintenance. Please save your work."
- Save announcement
- Banner displays immediately on all pages
- All users see the notice
- Users can close if acknowledged
- Automatically expires after end date
Important Policy Update
Scenario: New policy all users must know
Process:
- Create announcement
- Title: "Updated Privacy Policy"
- Mode: "Always"
- Start Date: Today
- End Date: One week from now
- Content: "Our privacy policy has been updated. Please review the changes in Settings."
- Save announcement
- Banner displays and cannot be closed by users
- Ensures all users see critical information
- Expires automatically after one week
Event Announcement
Scenario: Upcoming organization event
Process:
- Create announcement
- Title: "Annual Meeting Next Friday"
- Mode: "Until Closed"
- Start Date: One week before event
- End Date: Day after event
- Content: "Don't forget our Annual Meeting next Friday at 10 AM in Conference Room A. Attendance is mandatory."
- Save announcement
- Users see reminder leading up to event
- Can close once acknowledged
- Automatically removed after event
Urgent Update
Scenario: Immediate attention needed
Process:
- Create announcement quickly
- Title: "URGENT: Check Your Email"
- Mode: "Always"
- Start Date: Right now
- End Date: End of day
- Content: "Important time-sensitive information has been sent to your email. Please check and respond by 5 PM today."
- Save immediately
- Banner displays on all pages instantly
- Cannot be dismissed (Always mode)
- Ensures maximum visibility
- Auto-expires at end of day
Best Practices
Title Guidelines
- Be Concise: Keep titles short and clear
- Action-Oriented: Use imperative language when appropriate
- Clear Purpose: Make it obvious what the announcement is about
- Keywords First: Put most important words at beginning
Mode Selection
- Until Closed: Use for most announcements
- Allows users to dismiss after reading
- Reduces banner fatigue
- Better user experience
- Always: Reserve for critical information
- Use sparingly
- Only for truly urgent matters
- Can annoy users if overused
Date Range Planning
- Start Date:
- Use current date for immediate announcements
- Use future date for scheduled announcements
- Consider time zones if applicable
- End Date:
- Set reasonable expiration
- Don't leave announcements active too long
- Account for weekends and holidays
- Clean up expired announcements
Content Writing
- Be Clear: Use simple, direct language
- Be Brief: Users won't read long messages in banner
- Include Action: Tell users what to do if applicable
- Proofread: Check for errors before saving
- Test Display: Check how it looks in banner after saving
Announcement Management
- One at a Time: Avoid multiple active announcements
- Regular Review: Check for expired announcements
- Delete Old Ones: Remove announcements no longer needed
- Plan Ahead: Schedule announcements in advance
- Update Rather Than Create: Edit existing for related updates
Troubleshooting
Announcement Not Displaying
Problem: Saved announcement doesn't show on pages
Possible Causes:
- Start date is in the future
- End date has passed
- User already closed "Until Closed" announcement
- System cache issue
Solutions:
- Check Start Date is today or earlier
- Check End Date is today or later
- For "Until Closed" mode, user may have dismissed
- Refresh browser page
- Clear browser cache
- Check announcement is actually saved in list
Cannot Save Announcement
Problem: Save button doesn't work
Possible Causes:
- Required fields missing
- End Date before Start Date
- Invalid date format
Solutions:
- Ensure all required fields filled:
- Title
- Mode
- Start Date
- End Date
- Verify End Date is after Start Date
- Check dates are in correct format
- Look for error messages on form
- Try refreshing page and re-entering
Banner Shows for Too Long
Problem: Announcement still displaying after it should end
Possible Causes:
- End Date set too far in future
- Mode set to "Always"
- Date not entered correctly
Solutions:
- Edit announcement
- Check End Date is correct
- Update End Date to sooner date
- Save changes
- Banner will disappear at end date
- Or delete announcement immediately
Users Cannot Close Banner
Problem: X button not working or missing
Possible Causes:
- Mode set to "Always"
- This is intentional design
Solutions:
- Check announcement Mode in list
- If "Always" mode, X button won't appear
- This is by design for critical announcements
- Edit to "Until Closed" mode if should be closeable
- Or wait for End Date to expire
- Or delete announcement
Multiple Announcements Showing
Problem: Too many banners displaying at once
Possible Causes:
- Multiple announcements have overlapping dates
- All are within active date range
Solutions:
- Review announcements list
- Check which have overlapping dates
- Adjust dates to avoid overlap
- Delete or expire old announcements
- Keep only one announcement active at a time
- Consider combining related announcements
Related Features
- Settings - Organization settings and configuration
- Dashboard - Main dashboard where announcements display
- Members Management - Manage users who see announcements
Tips
- Marquee Display: Announcements appear as banner at top of every page
- Organization-Wide: All users see the announcement
- Until Closed Mode: Best for most announcements, allows users to dismiss
- Always Mode: Use only for critical information that must be seen
- Set End Dates: Always set reasonable end dates to auto-expire
- Be Concise: Users won't read long messages in banners
- One at a Time: Avoid multiple active announcements
- Test Immediately: Check banner display right after saving
- Clean Up: Delete old announcements regularly
- Plan Ahead: Can schedule future announcements with Start Date
- User Dismissal: "Until Closed" allows each user to close individually
- Auto-Expiration: Announcements automatically stop displaying after End Date