Bulk Upload Background Checks
Purpose
Import multiple background check records simultaneously using an Excel template, enabling efficient initial setup or large-scale updates of compliance data.
Access
From Background Checks page:
- Click the ⬆ Bulk Upload button
- Bulk Upload dialog opens
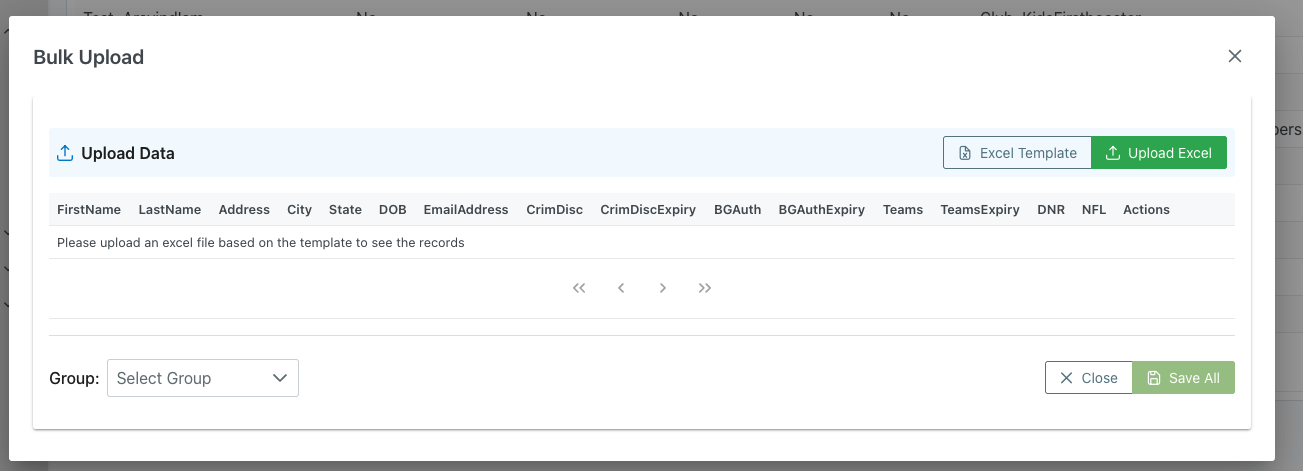
Screenshot
Description
The Bulk Upload dialog provides a streamlined process for importing multiple background check records from an Excel file. Using a standardized template ensures data consistency and allows for efficient population of the background checks database.
Dialog Header
- Title: "Bulk Upload"
- Close Button: X icon in the top-right corner to dismiss
- Purpose: Mass import of compliance records
Upload Interface
Upload Data Section
Section Header
- Icon: ⬆ Upload icon
- Label: "Upload Data"
- Background: Light blue/cyan background
- Purpose: Primary upload area
Action Buttons (Right Side)
📄 Excel Template
- Icon: Document icon
- Label: "Excel Template"
- Color: White/outlined button
- Action: Download the template Excel file
- Purpose:
- Get the correct format for upload
- Ensures all required columns included
- Provides column header names
- Shows expected data format
- File: Typically named "background_checks_template.xlsx" or similar
- Use: Always download template before creating import file
⬆ Upload Excel
- Icon: Upload arrow icon
- Label: "Upload Excel"
- Color: Green background
- Action: Select and upload filled Excel file
- Purpose: Import data from completed template
- Accepts: .xlsx, .xls file formats
- Validation: Checks data format and required fields
Column Headers Display
The interface shows the expected column structure:
Required Columns
FirstName
- Data Type: Text
- Required: Yes
- Example: "Austin", "John"
- Validation: Cannot be empty
LastName
- Data Type: Text
- Required: Yes
- Example: "Abbott", "Smith"
- Validation: Cannot be empty
Address
- Data Type: Text
- Required: Optional
- Example: "123 Main Street"
- Format: Street address
City
- Data Type: Text
- Required: Optional
- Example: "Indianapolis"
State
- Data Type: Text
- Required: Optional
- Example: "IN", "Indiana"
- Format: Two-letter code or full name
DOB
- Data Type: Date
- Required: Yes
- Format: MM/DD/YYYY or YYYY-MM-DD
- Example: "06/16/1985", "1985-06-16"
- Validation: Must be valid date
EmailAddress
- Data Type: Email
- Required: Yes
- Example: "austin.abbott@demo.com"
- Validation: Must be valid email format
CrimDisc (Criminal Check)
- Data Type: Text
- Required: Optional
- Values: "Yes", "No"
- Default: "No" if blank
CrimDiscExpiry
- Data Type: Date
- Required: Optional (Required if CrimDisc is "Yes")
- Format: MM/DD/YYYY or YYYY-MM-DD
- Example: "01/20/2026"
BGAuth (Background Authorization)
- Data Type: Text
- Required: Optional
- Values: "Yes", "No"
- Default: "No" if blank
BGAuthExpiry
- Data Type: Date
- Required: Optional (Required if BGAuth is "Yes")
- Format: MM/DD/YYYY or YYYY-MM-DD
Teams (Training)
- Data Type: Text
- Required: Optional
- Values: "Yes", "No"
- Default: "No" if blank
TeamsExpiry
- Data Type: Date
- Required: Optional (Required if Teams is "Yes")
- Format: MM/DD/YYYY or YYYY-MM-DD
DNR (Do Not Recruit)
- Data Type: Text
- Required: Optional
- Values: "Yes", "No"
- Default: "No" if blank
NFL (Credentialed)
- Data Type: Text
- Required: Optional
- Values: "Yes", "No"
- Default: "No" if blank
Actions
- Purpose: System action column (may be for internal use)
- User Entry: Typically left blank
Data Preview Area
Empty State
- Message: "Please upload an excel file based on the template to see the records"
- Purpose: Indicates no file uploaded yet
- Visual: Empty table area with navigation controls
After Upload
- Shows: Preview of imported data
- Columns: All column headers displayed
- Rows: Imported records shown
- Validation: Highlights any errors or issues
- Review: Opportunity to verify before saving
Navigation Controls
- ⏮ First: Not active when empty
- ◀ Prev: Not active when empty
- ▶ Next: Not active when empty
- ⏭ Last: Not active when empty
- Purpose: Navigate through imported records for review
Group Assignment
Group Selector
- Label: "Group:"
- Type: Dropdown select
- Placeholder: "Select Group"
- Purpose: Assign all uploaded records to a specific organization/group
- Required: May be required depending on system setup
- Use: Bulk assign organization to all imported members
Action Buttons
✕ Close
- Position: Bottom-right, left button
- Action: Close dialog without saving
- Result:
- Uploaded file is not processed
- No records are imported
- Returns to Background Checks page
- All work is discarded
💾 Save All (Green)
- Position: Bottom-right, right button
- Action: Import all records from uploaded file
- Requirements:
- File must be uploaded
- Data must pass validation
- Group must be selected (if required)
- Result:
- All records imported to database
- Records appear in main Background Checks list
- Dialog closes
- Success notification shown
- Count of imported records provided
Upload Process
Step-by-Step Upload
1. Download Template
- Click Excel Template button
- Save template file to computer (typically "xls_backgroundChecks.xls" or similar)
- Open in Microsoft Excel, Google Sheets, or LibreOffice
2. Review Template
- Open the template file
- Review the Documentation sheet for guidance:
- Column names and requirements
- Sample data formats
- Optional vs required fields
- Note: "For optional values, leave blank if not needed"
- Switch to the Data sheet (main sheet)
3. Prepare Data
- Work in the Data sheet (not Documentation)
- Review column headers (do not modify headers)
- En4. Upload File
- Click Upload Excel button
- Navigate to saved file
- Select file
- Click Open/Upload
- Wait for file to process
- System reads data from Data sheet
5e file (keep as .xlsx format)
3. Upload File
- Click Upload Excel button
- Navigate to saved file
- Select file
- Click Open/Upload
- Wait for file to process
4. Review Preview
- Examine uploaded data in preview table
- Check for any validation errors (often highlighted in red)
- Verify data looks correct
- Note count of records to be imported
- If errors, close and fix Excel file, then re-upload
- Select Group
- Click Group dropdown
- Select appropriate organization
- All imported records will be assigned to this group
7
6. Save
- Click Save All button
- Wait for import to complete
- Review success message
- Dialog closes
- Verify records in main list
Use Cases
Initial System Setup
Scenario: Populating background checks for existing organization
Process:
- Download Excel template
- Gather all background check records
- Enter data systematically into template:
- All member names
- Contact information
- Current check statuses
- All expiry dates
- Review for completeness and accuracy
- Upload file
- Select organization from Group dropdown
- Review preview carefully
- Click Save All
- Verify all records imported correctly
- Spot-check several records for accuracy
Annual Renewal Import
Scenario: Importing renewed background checks from vendor
Process:
- Receive renewal data from background check vendor
- Download template
- Format vendor data to match template columns
- Copy/paste or manually enter data
- Include updated expiry dates
- Upload file
- Preview shows all renewals
- Select group if applicable
- Save All
- Updated records now current
New Member Batch
Scenario: Adding background checks for group of new members
Process:
- Collect information for all new members
- Download template
- Enter new member information
- Set initial statuses (use "No" for not completed, "Yes" for completed)
- Add expiry dates for completed checks
- Upload file
- Select appropriate group
- Review and save
- New members now in system
Third-Party Data Import
Scenario: Importing data from external screening service
Process:
- Export data from screening service
- Download template from system
- Map screening service columns to template columns
- Transfer data (may require transformation)
- Ensure date formats match
- Upload completed template
- Review for any format errors
- Correct and re-upload if needed
- Save when clean
Migrating from Old System
Scenario: Moving background check data from legacy system
Process:
- Export all data from old system
- Download template
- Map old system fields to new template
- Handle any data format differences
- Convert dates to required format
- Import in batches (e.g., by organization)
- Verify each batch
- Address any import errors
- Complete migration systematically
Excel Template Guidelines
Template Structure
The Excel template contains two sheets to guide your data entry:
Documentation Sheet
- Tab Name: "Documentation"
- Purpose: Provides instructions and column specifications
- Contents:
- Title: "Bulk Stand Upload"
- Instruction: "For optional values, leave blank if not needed."
- Column reference table showing:
- Column names
- Required/Optional status
- Sample data formats
- Usage: Reference this sheet while filling data
- Do Not Edit: Keep this sheet for reference only
Data Sheet
- Tab Name: "Data" (or main sheet)
- Purpose: Where you enter actual records
- Usage: This is the sheet that gets imported
Header Row (Data Sheet)
- Row 1: Column headers exactly as provided
- Do Not Modify: Changing headers causes import failure
- Case Sensitive: Maintain exact capitalization
- No Extra Columns: Only use provided columns
- Column Order: LastName, FirstName, Address, City, State, DOB, EmailAddress, CrimDisc, CrimDiscExpiry, BGAuth, BGAuthExpiry, Teams, TeamsExpiry, DNR, NFL
Data Rows
- Start: Row 2 and below
- No Limit: Can have many rows (thousands)
- No Blank Rows: Don't leave blank rows between data
- Complete Rows: Fill all required fields for each row
- Optional Fields: Leave blank if not needed (as noted in Documentation sheet)
Data Entry Best Practices
Text Fields
- Plain Text: No special formatting
- No Leading/Trailing Spaces: Trim spaces
- Consistent: Use same format for all entries
- Character Limits: Stay within reasonable lengths
Date Fields
- Format Options:
- MM/DD/YYYY (e.g., 01/20/2026)
- YYYY-MM-DD (e.g., 2026-01-20)
- yyyy-mm-dd (as shown in template documentation, e.g., 1985-06-16)
- Excel Date Cells: Can use Excel date format
- Consistency: Use same format throughout file
- Valid Dates: Ensure dates are real (no Feb 30)
- Future Dates: Expiry dates should be in future
- Sample Formats from Template:
- DOB: yyyy-mm-dd (Year-Month-Day) format
- CrimDiscExpiry: yyyy-mm-dd (Year-Month-Day)
- BGAuthExpiry: yyyy-mm-dd (Year-Month-Day)
- TeamsExpiry: yyyy-mm-dd (Year-Month-Day)
Status Fields
- Exact Values: Use exactly "Yes" or "No"
- Case Sensitive: Capitalize properly
- No Variations: Don't use "yes", "YES", "Y", etc.
- Consistency: Same value format throughout
Email Fields
- Valid Format: name@domain.com
- No Spaces: Trim all spaces
- Lowercase: Convention is lowercase
- Unique: Each email should be unique
Template Reference Guide
The template's Documentation sheet provides a complete reference:
| Column | Required | Sample Data Format |
|---|---|---|
| LastName | Yes | - |
| FirstName | Yes | - |
| Address | Optional | - |
| City | Optional | Yes |
| State | Optional | - |
| DOB | Optional | yyyy-mm-dd (Year-Month-Day) |
| EmailAddress | Optional | If provided, should be a valid email address format |
| CrimDisc | Optional - Defaults to No | Yes |
| CrimDiscExpiry | Optional | yyyy-mm-dd (Year-Month-Day) |
| BGAuth | Optional - Defaults to No | Yes |
| BGAuthExpiry | Optional | yyyy-mm-dd (Year-Month-Day) |
| Teams | Optional | yyyy-mm-dd (Year-Month-Day) |
| TeamsExpiry | Optional - Defaults to No | Yes |
| DNR | Optional - Defaults to No | Yes |
| NFL | Optional - Defaults to No | Yes |
Note: For optional values, leave blank if not needed.
Common Template Mistakes
Column Errors
- ❌ Modifying column headers
- ❌ Adding extra columns
- ❌ Deleting columns
- ❌ Reordering columns
- ❌ Deleting the Documentation sheet
- ✅ Use template exactly as provided
- ✅ Keep both sheets intact
Data Errors
- ❌ Wrong date format (e.g., "Jan 20, 2026")
- ❌ Invalid status values (e.g., "Complete", "Pending", "Expired" instead of "Yes" or "No")
- ❌ Missing required fields (LastName, FirstName)
- ❌ Invalid email formats
- ❌ Entering data in Documentation sheet
- ✅ Follow format requirements exactly
- ✅ Reference Documentation sheet for guidance
File Errors
- ❌ Saving as .csv instead of .xlsx
- ❌ Deleting template sheets
- ❌ Protected or locked cells
- ❌ Formulas instead of values
- ✅ Save as .xlsx with both Documentation and Data sheets
- ✅ Only modify the Data sheet
Validation and Error Handling
Pre-Import Validation
System Checks:
- Required fields are filled
- Dates are valid format
- Status values match allowed values
- Email format is valid
- No duplicate emails (if enforced)
Error Display:
- Errors highlighted in preview (often red)
- Error message describes issue
- Row number indicated
- Multiple errors can be shown
Handling Errors
If Validation Fails
- Note which rows have errors
- Close upload dialog
- Open Excel file
- Fix indicated errors
- Save file
- Re-upload
- Verify errors resolved
Common Error Messages
- "Required field missing": Fill in required field
- "Invalid date format": Use MM/DD/YYYY or YYYY-MM-DD
- "Invalid email": Check email format
- "Invalid status value": Use "Yes" or "No" only
- "Duplicate email": Check for duplicate entries
Post-Import Verification
After Successful Import:
- Check record count matches expected
- Spot-check several records for accuracy
- Verify dates imported correctly
- Check status values are correct
- Confirm group assignment
- Export to compare with original file if needed
Best Practices
File Preparation
Data Quality
- Clean Data: Remove duplicates before import
- Verify Accuracy: Double-check all information
- Complete Information: Fill as many fields as possible
- Consistent Formats: Use same format throughout
- Source Documents: Reference official documents
Organization
- Batch by Group: Import one organization at a time
- Manageable Sizes: Consider splitting very large files
- Backup: Keep backup of original data
- Documentation: Note what each file contains
- Version Control: Name files clearly (e.g., "bg_checks_2026-01-04.xlsx")
Upload Process
Systematic Approach
- Test First: Upload small test file first
- Review Carefully: Always review preview before saving
- One at a Time: Don't upload multiple files simultaneously
- Verify: Check records after each import
- Document: Note what was imported and when
Error Prevention
- Use Template: Always start with downloaded template
- No Manual Headers: Don't type column names
- Check Examples: Look at template examples if provided
- Validate Before Upload: Check data in Excel first
- Take Time: Don't rush the import process
After Upload
Verification
- Count Check: Verify record count
- Spot Check: Review random sample
- Export Compare: Export and compare to original
- Group Check: Verify correct group assignment
- Date Verification: Check date fields imported correctly
Follow-Up
- Member Notification: Inform members their data was added
- Monitor Expiries: Set up expiry monitoring
- Audit: Document the import for records
- Archive: Keep import file for reference
- Next Steps: Plan follow-up actions (renewals, etc.)
Troubleshooting
Cannot Upload File
Problem: Upload button doesn't work or file rejected
Possible Causes:
- Wrong file format (.csv instead of .xlsx)
- File corrupted
- File too large
- Browser issue
Solutions:
- Verify file is .xlsx format
- Try re-saving file in Excel
- Check file size (may have limit)
- Try different browser
- Close and reopen dialog
Preview Shows No Data
Problem: File uploads but preview is empty
Possible Causes:
- Data is in wrong sheet (entered in Documentation sheet)
- Column headers don't match template
- All rows have validation errors
- Data starts in wrong row
- Data sheet is hidden or missing
Solutions:
- Ensure data is in Data sheet, not Documentation sheet
- Verify column headers match exactly (LastName, FirstName, etc.)
- Check if error messages displayed
- Ensure data starts in row 2
- Verify both sheets present in template
- Download fresh template and try again
Some Records Won't Import
Problem: Only partial records imported
Possible Causes:
- Some rows have validation errors
- Required fields missing in some rows
- Duplicate emails in some rows
Solutions:
- Review error messages in preview
- Note which rows failed
- Fix errors in Excel file
- Upload again with corrected file
- May need to import problem records individually
Dates Import Incorrectly
Problem: Dates show wrong values after import
Possible Causes:
- Excel date format not recognized
- Date format doesn't match expected format
- Dates stored as text in Excel
Solutions:
- Format date cells in Excel as Date type
- Use consistent date format (MM/DD/YYYY)
- Convert text dates to actual dates
- Check Excel regional settings
- Manually enter dates in standard format
Related Features
- Background Checks Overview - Main background checks management
- Create/Edit Background Check - Individual record entry
- Bulk Edit - Edit multiple records after import
- Members Management - Member information
Tips
Review Documentation Sheet**: Check the Documentation tab for column requirements and sample formats 3. Enter Data in Data Sheet: Only fill data in the Data sheet, not Documentation 4. Test Small: Test with 5-10 records before full import 5. Date Format: Use yyyy-mm-dd format as shown in template (e.g., 1985-06-16) 6. Leave Blanks: For optional values, leave blank if not needed (don't enter "N/A", "-", "Pending", or "Expired") 7. Exact Values: Use "Yes" or "No" only for status fields 8. Clean Data: Remove duplicates before importing 9. Backup First: Export current data before large imports 10. Review Preview: Always carefully review before clicking Save All 11. Save Template: Keep completed template file for reference 12. One Group: Import one organization at a time for clarity 13. Keep Both Sheets: Don't delete Documentation sheet from template 14 Save Template: Keep completed template file for reference 9. One Group: Import one organization at a time for clarity 10. Verify After: Always verify records after import completes