Position Management
Purpose
Define and configure position types within each stand, including required quantities and liquor license (LL) requirements.
Access
From Stands view:
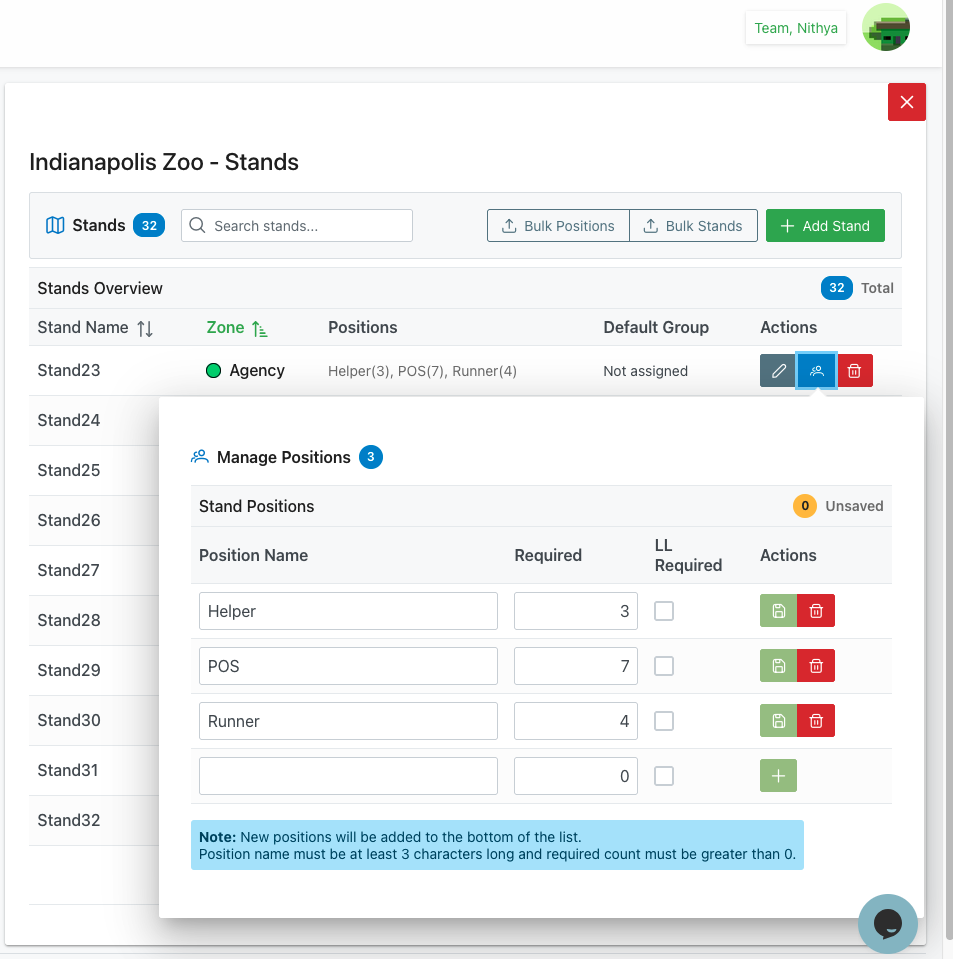
- Locate stand in the table
- Click Manage Positions button (👥 blue icon)
- Manage Positions dialog opens for that stand
Screenshot
Description
The Position Management interface allows you to define the specific position types needed at each stand, set how many of each position are required, and configure special requirements like liquor license (LL) requirements. This granular configuration ensures proper staffing and member allocation for each stand.
Key Features
Position Type Definition
- Multiple position types per stand
- Custom position names
- Required quantity per position
- Liquor license (LL) requirements
Flexible Configuration
- Add unlimited position types
- Edit existing positions
- Remove unused positions
- Real-time validation
Unsaved Changes Tracking
- Visual indicator for unsaved changes
- Prevents accidental data loss
- Clear save status
Dialog Structure
Header Section
Dialog Title
- Icon: 👥 People/group icon (blue)
- Text: "Manage Positions"
- Count Badge: Blue badge with "3" (or number of positions)
- Purpose: Shows how many position types configured
Close Button
- Position: Top-right corner (outside dialog on main page)
- Icon: ✕ X icon
- Color: Red background
- Action: Close dialog (may prompt if unsaved changes)
Position Table Header
Section Title: "Stand Positions"
Unsaved Indicator
- Position: Top-right of table
- Icon: ⚠️ Circle with "0"
- Label: "Unsaved"
- Purpose: Shows number of unsaved changes
- Colors:
- Gray/inactive when no changes
- Orange/yellow when changes pending
- Updates: Real-time as changes made
Table Columns
Position Name
- Header: "Position Name"
- Type: Text input field
- Purpose: Name of position type
- Examples:
- "Helper"
- "POS"
- "Runner"
- Editable: Yes, inline editing
- Required: Yes
- Validation: Must be at least 3 characters (per note)
- Best Practice: Clear, descriptive names
Required
- Header: "Required"
- Type: Number input
- Purpose: How many of this position needed
- Examples:
- "3" (3 Helpers needed)
- "7" (7 POS positions needed)
- "4" (4 Runners needed)
- Editable: Yes, inline editing
- Required: Yes
- Validation: Must be greater than 0 (per note)
- Default: May default to 1
- Format: Integer (whole numbers only)
LL Required
- Header: "LL Required"
- Label: "LL" stands for "Liquor License"
- Type: Checkbox
- Purpose: Whether position requires a liquor license
- States:
- ☐ Unchecked: LL not required
- ☑ Checked: LL required
- Editable: Toggle on/off
- Usage: Filters qualified members for assignment
- Meaning: Member must meet the liquor license requirement (per your org's policy)
Actions
- Column: Action buttons per position
💾 Save (Green)
- Icon: Save/disk icon
- Color: Green background
- Action: Save this specific position
- Shows: For modified positions
- Result: Saves changes, updates count
🗑️ Delete (Red)
- Icon: Trash/bin icon
- Color: Red outlined button
- Action: Delete this position type
- Confirmation: May prompt for confirmation
- Restriction: Cannot delete if members assigned
- Result: Removes position from stand
Add New Position Row
Empty Row
- Appears at bottom of table
- All fields blank and editable
- Purpose: Add new position type
Add Button
- Icon: ➕ Plus icon in green circle
- Position: Actions column of empty row
- Action: Add new position type
- Validation: Checks required fields before adding
- Result: New position added to table
Information Notes
Blue Info Banner
- Position: Below table
- Icon: ℹ️ Information icon
- Background: Light blue
- Text: "Note: New positions will be added to the bottom of the list. Position name must be at least 3 characters long and required count must be greater than 0."
- Purpose: Guidelines for adding positions
Adding a Position
Step-by-Step Process
1. Access Empty Row
- Scroll to bottom of position table
- Find empty row with blank fields
- All fields ready for input
2. Enter Position Name
- Click in "Position Name" field
- Type position name (minimum 3 characters)
- Examples: "Helper", "Supervisor", "POS"
- Press Tab or click next field
3. Set Required Quantity
- Click in "Required" field
- Enter number needed (must be > 0)
- Example: "5" for 5 of this position
- Use whole numbers only
4. Set LL Requirement (Optional)
- Click "LL Required" checkbox if needed
- Check if a liquor license is required
- Leave unchecked if not required
5. Add Position
- Click green ➕ Plus button in Actions column
- System validates:
- Position name at least 3 characters
- Required count greater than 0
- If valid:
- Position added to list
- New empty row appears
- Unsaved counter increments
6. Repeat
- Continue adding more positions as needed
- Each appears in table above
- Empty row remains at bottom
7. Save All Changes
- Review all positions
- Ensure accuracy
- Save changes (see Saving Changes section)
Editing a Position
Inline Editing Process
1. Locate Position
- Find position in table
- Identify which field to modify
2. Edit Field
- Click in field to edit
- Position Name: Change text
- Required: Update number
- LL Required: Toggle checkbox
3. Observe Changes
- Field updates immediately
- Unsaved counter increments
- Save button may appear in Actions
4. Save Position
- Click green Save button (💾) in Actions for that position
- OR: Save all positions at once (if bulk save available)
- Changes persist to database
Editing Multiple Positions
- Make changes to multiple positions
- Each edit increments unsaved counter
- Save individually or all at once
- Unsaved counter decreases as positions saved
Deleting a Position
Delete Process
1. Locate Position
- Find position to delete in table
- Verify it's the correct position
2. Click Delete
- Click red Delete button (🗑️) in Actions column
- Confirmation dialog may appear
3. Confirm Deletion
- Read confirmation message
- Confirm you want to delete
- OR: Cancel if changed mind
4. Result
- Position removed from table
- Unsaved counter may update
- Cannot undo (unless cancel before save)
Delete Restrictions
Cannot Delete If:
- Position has members assigned
- Position in active schedules
- Historical event references exist
Error Messages:
- "Cannot delete position with assigned members"
- "Position is referenced in schedules"
- "Must remove assignments first"
Safe Deletion:
- Check for member assignments
- Reassign members to other positions
- Clear schedule references
- Then delete position
Saving Changes
Save Indicators
Unsaved Counter
- Display: "⚠️ 0 Unsaved"
- Updates: Real-time with each change
- Orange Badge: Highlights when unsaved changes exist
- Purpose: Reminds to save before closing
Individual Save Buttons
- Green save button per modified position
- Click to save that specific position
- Button disappears after save
- Unsaved counter decrements
Saving Methods
Method 1: Individual Position Save
- Edit position
- Click green Save button (💾) for that position
- Position saved to database
- Unsaved counter decrements
- Repeat for other positions
Method 2: Bulk Save (if available)
- Make multiple changes
- Click main Save button (if provided)
- All changes saved at once
- Unsaved counter resets to 0
- Success message shown
Method 3: Close Dialog
- Some implementations auto-save on close
- May prompt if unsaved changes
- Choose: Save and Close, or Discard Changes
Best Practice
- Save frequently to prevent data loss
- Don't close with unsaved changes
- Verify unsaved counter is 0 before closing
- Check success confirmations
Position Configuration Examples
Example 1: Basic Stand Configuration
Stand: "Stand23"
Positions:
| Position Name | Required | LL Required |
|---|---|---|
| Helper | 3 | ☐ No |
| POS | 7 | ☐ No |
| Runner | 4 | ☐ No |
Total Needed: 14 members (3+7+4)
Use Case: Standard configuration, no special requirements
Example 2: Large Venue Configuration
Stand: "Stadium Main Gate"
Positions:
| Position Name | Required | LL Required |
|---|---|---|
| Supervisor | 2 | ☑ Yes |
| Helper | 10 | ☐ No |
| POS | 8 | ☑ Yes |
| Runner | 6 | ☐ No |
| Security | 4 | ☑ Yes |
Total Needed: 30 members LL Required: 14 positions require a liquor license
Use Case: Large venue, some positions require licensed staff
Example 3: Premium Stand Configuration
Stand: "VIP Suite A"
Positions:
| Position Name | Required | LL Required |
|---|---|---|
| Concierge | 1 | ☑ Yes |
| Server | 3 | ☑ Yes |
| Bartender | 2 | ☑ Yes |
Total Needed: 6 members LL Required: All positions require a liquor license
Use Case: Premium area requires licensed staff only
Use Cases
Initial Stand Setup
Scenario: Configuring positions for newly created stand
Process:
- Open Manage Positions for stand
- Add first position (e.g., "Helper")
- Set required quantity (e.g., "5")
- Set LL requirement if needed
- Click Add button
- Repeat for each position type needed:
- POS positions
- Runners
- Supervisors
- Any specialized roles
- Save all positions
- Stand ready for member assignments
Adjusting Position Requirements
Scenario: Venue changes require different staffing
Process:
- Open Manage Positions
- Locate position to adjust
- Update Required field (increase or decrease)
- Click Save for that position
- Repeat for other positions as needed
- New requirements take effect immediately
Adding New Position Type
Scenario: New role needed at stand
Process:
- Open Manage Positions
- Scroll to empty row at bottom
- Enter new position name (e.g., "Cashier")
- Set required quantity
- Check LL Required if applicable
- Click Add button
- Save changes
- Position now available for scheduling
Removing Unused Position
Scenario: Position type no longer needed
Process:
- Open Manage Positions
- Verify position has no assignments
- Click Delete button for position
- Confirm deletion
- Position removed from stand
- Adjust other positions if needed to maintain coverage
Liquor License Requirement Setup
Scenario: Requiring a liquor license for certain positions
Process:
- Identify positions that require a liquor license
- Open Manage Positions
- For each applicable position:
- Check LL Required checkbox
- Save position
- System now filters for qualified members
- Only members meeting the LL requirement can be assigned
Best Practices
Position Naming
- Clear Labels: Use names everyone understands
- Consistent: Same names across stands when appropriate
- Descriptive: Explain role clearly
- Avoid Abbreviations: Unless universally known
- Standard Terms: Use industry-standard position names
Quantity Setting
- Accurate Counts: Base on actual needs
- Peak Coverage: Consider busiest times
- Safety Requirements: Meet minimum staffing
- Flexibility: Allow for adjustments
- Historical Data: Use past events as guide
LL Requirements
- Strategic Use: Only require for positions where a liquor license is necessary
- Qualification Criteria: Ensure LL criteria are clearly defined
- Member Pool: Don't over-restrict if unnecessary
- Training Path: Provide a path for members to obtain/record required licensing
- Consistent Application: Apply consistently across similar positions
Save Discipline
- Frequent Saves: Save after each position configured
- Check Counter: Monitor unsaved counter
- Before Closing: Always save before closing dialog
- Verify Changes: Check positions saved correctly
- Backup Plan: Note changes before saving in case of error
Troubleshooting
Cannot Add Position
Problem: Add button doesn't work or disabled
Possible Causes:
- Position name less than 3 characters
- Required count is 0 or empty
- Invalid characters in name
Solutions:
- Check position name is at least 3 characters
- Ensure Required field has number greater than 0
- Remove special characters from position name
- Review validation error messages
- Try different position name
Unsaved Counter Stuck
Problem: Unsaved counter doesn't decrease after saving
Possible Causes:
- Save didn't complete
- Browser/network issue
- Validation error prevented save
Solutions:
- Try saving again
- Refresh page and re-enter changes
- Check for error messages
- Verify internet connection
- Try different browser
Cannot Delete Position
Problem: Delete button disabled or fails
Possible Causes:
- Position has member assignments
- Position in active schedules
- Insufficient permissions
Solutions:
- Check for member assignments to position
- Remove assignments first
- Reassign members to other positions
- Check active schedules using position
- Contact administrator if persists
Changes Not Saving
Problem: Edits don't persist after save
Possible Causes:
- Validation error
- Network interruption
- Browser issue
- Session timeout
Solutions:
- Check for validation errors
- Verify internet connection stable
- Refresh page and log back in
- Try different browser
- Contact support if continues
LL Checkbox Not Working
Problem: Cannot check or uncheck LL Required
Possible Causes:
- Position not saved first
- Permissions issue
- Browser rendering problem
Solutions:
- Save position before toggling LL
- Refresh page
- Check user permissions
- Try different browser
- Clear browser cache
Related Features
- Stands Management - Create and manage stands
- Locations Overview - Main locations management
- Schedule Management - Assign members to positions
- Members Management - Member qualifications and assignments
Tips
- Minimum 3 Characters: Position names must be at least 3 characters long
- Required Must Be > 0: Enter valid quantity greater than zero
- LL for Liquor License: Use LL Required for positions requiring a liquor license
- Save Frequently: Don't lose work - save after each addition/edit
- Watch Counter: Monitor unsaved changes indicator
- Plan First: Map out position needs before starting configuration
- Consistent Names: Use same position names across similar stands
- Test Assignments: Verify positions work with member scheduling
- Historical Reference: Review past events for staffing needs
- LL Criteria: Ensure team knows LL (liquor license) requirements
- Add Button: Must click Add button to create new positions
- Delete Carefully: Cannot undo deletions once saved