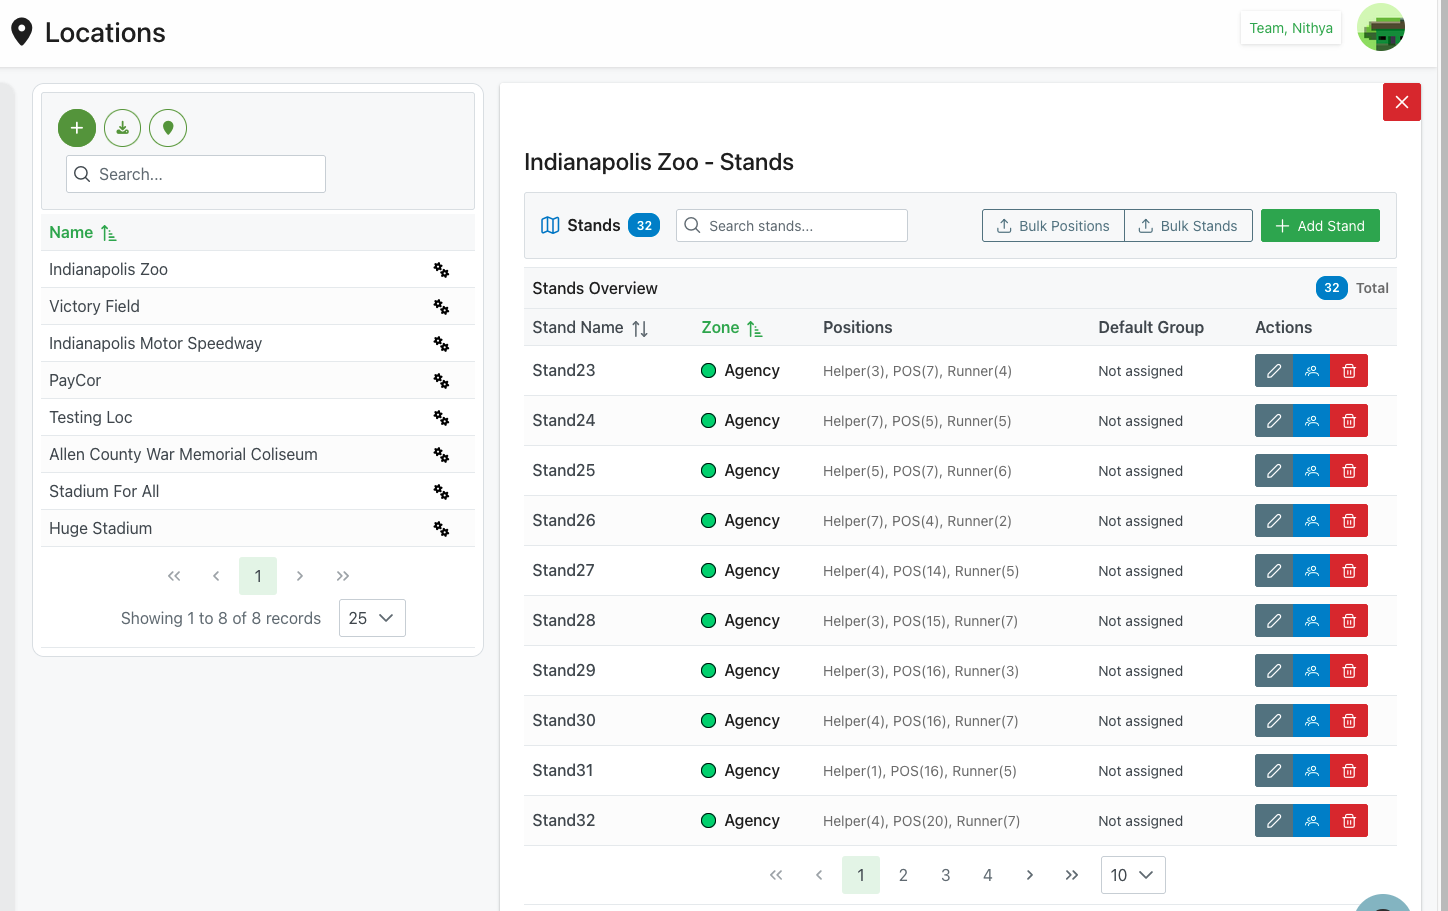
Stands Management
Purpose
Configure stands (sections/areas) within a location and manage the position types available at each stand.
Access
From Locations page:
- Click on a location name in the list
- Stands management interface opens for that location
- OR: Click settings icon → "Manage Stands"
Screenshot
Description
The Stands management interface allows you to define and organize the various stands, sections, or areas within a venue location. Each stand can be assigned to zones (with color coding), configured with specific position types, and assigned to default groups. This provides detailed organization for large venues with multiple working areas.
Key Features
Stand Organization
- Multiple stands per location
- Zone-based grouping with color indicators
- Position requirements per stand
- Default group assignments
Position Configuration
- Define position types for each stand
- Set required quantity for each position
- Liquor License (LL) requirements
- Position-specific settings
Bulk Operations
- Bulk position management
- Bulk stand operations
- Import/export capabilities
Page Structure
Header Section
Page Title
- Format:
[Location Name] - Stands - Example: "Indianapolis Zoo - Stands"
- Purpose: Shows which location you're managing stands for
- User Info: Current user display (e.g., "Team, Nithya")
Close Button
- Position: Top-right corner
- Icon: ✕ X icon
- Color: Red background
- Action: Close stands view, return to locations list
Action Toolbar
📊 Stands Tab
- Position: Left side
- Icon: Grid/list icon
- Label: "Stands"
- Badge: Blue badge with count (e.g., "32")
- Purpose: Shows number of stands at location
- State: Active when viewing stands list
🔍 Search Stands
- Position: Next to Stands tab
- Icon: Magnifying glass
- Placeholder: "Search stands..."
- Function: Filter stands by name or zone
- Real-time: Updates table as you type
📥 Bulk Positions
- Position: Top-right, first button
- Icon: Download/import icon
- Label: "Bulk Positions"
- Action: Open bulk position management
- Purpose: Manage positions across multiple stands at once
📤 Bulk Stands
- Position: Top-right, middle button
- Icon: Upload/export icon
- Label: "Bulk Stands"
- Action: Export or import stand configurations
- Purpose: Mass stand operations
➕ Add Stand
- Position: Top-right, rightmost button
- Color: Green
- Icon: Plus icon
- Label: "Add Stand"
- Action: Opens stand creation dialog
- Purpose: Create new stand for this location
Stands Overview Table
Header Row
- Section Title: "Stands Overview"
- Total Count: Blue badge showing total stands (e.g., "32 Total")
Columns
Stand Name
- Header: "Stand Name"
- Sort Icon: ↕️ Up/down arrows
- Content: Stand identifier
- Format: Typically "Stand##" format
- Examples:
- "Stand23"
- "Stand24"
- "Stand25"
- Sortable: Click header to sort alphabetically
- Clickable: Click name to expand position details
Zone
- Header: "Zone"
- Sort Icon: ↕️ Up/down arrows
- Visual: Colored circle indicator
- Format: Zone name with color dot
- Example: "● Agency" (green dot)
- Purpose: Visual grouping of stands by zone
- Sortable: Click to sort by zone name
- Color: Each zone has unique color for quick identification
Positions
- Header: "Positions"
- Content: Summary of position types and quantities
- Format: "Position(qty), Position(qty), Position(qty)"
- Examples:
- "Helper(3), POS(7), Runner(4)"
- "Helper(7), POS(5), Runner(5)"
- "Helper(5), POS(7), Runner(6)"
- Purpose: Quick overview of position requirements
- Numbers: Quantity needed for each position type
Default Group
- Header: "Default Group"
- Content: Group assignment for stand
- Example: "Not assigned"
- Purpose: Default group for members at this stand
- Editable: Can be changed via edit
Actions
- Column: Action buttons
- Icons: Three action buttons per row
✏️ Edit (Gray)
- First button
- Pencil icon
- Color: Gray/dark background
- Action: Edit stand details
- Opens edit dialog
👥 Manage Positions (Blue)
- Second button
- People/group icon
- Color: Blue background
- Action: Open position management for stand
- Shows position configuration dialog
🗑️ Delete (Red)
- Third button
- Trash icon
- Color: Red background
- Action: Delete stand
- Requires confirmation
- Cannot delete if positions assigned
Table Behavior
Row Expansion
- Click stand name to expand
- Shows position management inline
- Can edit positions directly
- Collapse by clicking name again
Sorting
- Click column headers to sort
- First click: Ascending
- Second click: Descending
- Sort indicator shows current sort
Empty State When no stands exist:
- Message: "No stands configured"
- Action: "Click Add Stand to create first stand"
- Icon: Empty state illustration
Creating a Stand
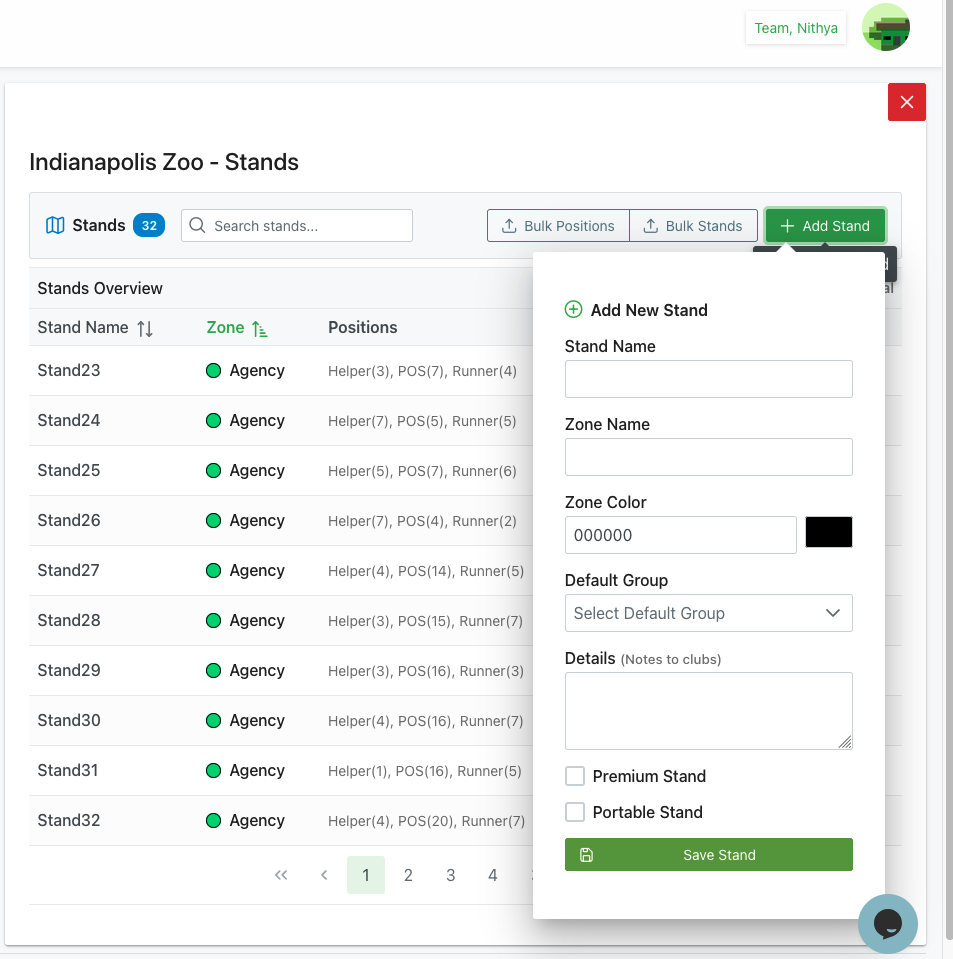
Add New Stand Dialog
Dialog Header
- Icon: ➕ Circled plus icon (green)
- Title: "Add New Stand"
- Purpose: Create new stand for location
Form Fields
Stand Name (Required)
- Label: "Stand Name"
- Type: Text input
- Purpose: Identifier for stand
- Examples: "Stand33", "Section A", "Gate 5"
- Validation: Must be unique within location
- Best Practice: Use consistent naming scheme
Zone Name
- Label: "Zone Name"
- Type: Text input
- Purpose: Group stands into zones
- Examples: "Agency", "North Side", "Main Concourse"
- Optional: Can leave blank
- Usage: Organizes stands visually by zone
Zone Color
- Label: "Zone Color"
- Type: Color picker
- Display: Color code input + color swatch
- Example: "000000" (black shown in screenshot)
- Format: 6-digit hex code
- Purpose: Visual zone identification in tables
- Default: May suggest color or use black
- Best Practice: Use distinct colors for different zones
Default Group
- Label: "Default Group"
- Type: Dropdown select
- Placeholder: "Select Default Group"
- Purpose: Assign stand to specific group
- Options: List of existing groups
- Optional: Can select "Not assigned"
- Usage: Auto-assigns members from this group to stand
Details (Notes to clubs)
- Label: "Details (Notes to clubs)"
- Type: Multiline text area
- Height: Approximately 4-5 lines
- Purpose: Internal notes or instructions about stand
- Optional: Additional information
- Examples:
- "Requires level 2 clearance"
- "Premium seating area"
- "High traffic location"
- Usage: Guidance for schedulers or members
Special Stand Flags
☐ Premium Stand
- Type: Checkbox
- Label: "Premium Stand"
- Purpose: Mark as premium/VIP area
- Unchecked: Regular stand
- Checked: Premium designation
- Usage: May affect assignments or pay rates
☐ Portable Stand
- Type: Checkbox
- Label: "Portable Stand"
- Purpose: Indicate mobile/temporary stand
- Unchecked: Fixed location stand
- Checked: Portable/movable stand
- Usage: Scheduling flexibility, setup requirements
Action Buttons
💾 Save Stand (Green)
- Position: Bottom-right
- Color: Green background
- Icon: Save/disk icon
- Label: "Save Stand"
- Action: Create stand with entered details
- Validation: Checks required fields
- Result:
- Stand added to list
- Dialog closes
- Success message
- Stand now available for position configuration
Implicit Cancel
- Action: Click outside dialog or close icon
- Result: Close without saving
- Confirmation: May prompt if data entered
Editing a Stand
Access Edit Dialog
- Find stand in table
- Click Edit button (✏️ pencil icon)
- Edit Stand dialog opens
Edit Stand Dialog
- Same fields as Add New Stand
- Current values pre-filled
- Can modify any field
- Save button labeled "Update Stand"
- Cancel button to discard changes
Editing Process
- Modify desired fields
- Click Update Stand
- Changes saved
- Table refreshes with updated info
- Dialog closes
Deleting a Stand
Delete Process
- Locate stand in table
- Click Delete button (🗑️ trash icon)
- Confirmation dialog appears
- Confirm deletion
- Stand removed from list
Delete Restrictions
Cannot delete stand if:
- Positions are assigned to members
- Stand used in active schedules
- Historical event references exist
Error Messages:
- "Cannot delete stand with assigned positions"
- "Stand is referenced in active schedules"
- Must reassign or remove references first
Safe Deletion
Before deleting:
- Remove all position assignments
- Reassign scheduled events
- Clear any member allocations
- Then delete stand
Managing Stand Positions
For detailed position configuration within each stand, see:
- Position Management - Configure position types, quantities, and requirements
Quick Position Access
- Find stand in table
- Click Manage Positions button (👥 blue icon)
- Position management dialog opens
- Configure positions for that specific stand
Bulk Operations
Bulk Positions
Purpose: Manage positions across multiple stands simultaneously
Access: Click Bulk Positions button
Use Cases:
- Apply same position types to multiple stands
- Update position quantities across stands
- Standardize position configurations
- Import position data from template
Bulk Stands
Purpose: Import or export stand configurations
Access: Click Bulk Stands button
Use Cases:
- Import stands from Excel/CSV
- Export current stand configuration
- Copy stands from another location
- Backup stand configurations
Use Cases
Initial Venue Setup
Scenario: Configuring stands for new location
Process:
- Open location's stands view
- Click Add Stand for each physical stand/section
- For each stand:
- Enter stand name (e.g., "Stand1", "Stand2")
- Assign to zone (e.g., "Agency", "North")
- Pick zone color for grouping
- Select default group if applicable
- Add any notes
- Save each stand
- Then configure positions for each stand
- Result: Complete venue layout mapped
Zone-Based Organization
Scenario: Organizing large venue by zones
Process:
- Define zones (e.g., "North Gate", "South Gate", "East Side")
- Choose distinct color for each zone
- Create stands and assign to appropriate zones
- Use zone colors for visual organization
- Sort by Zone column to see grouped stands
- Easier management and assignment
Premium Stand Configuration
Scenario: Designating VIP or special areas
Process:
- Create or edit stand
- Check "Premium Stand" checkbox
- Add details explaining premium status
- Assign to special group if applicable
- Configure with higher-level position requirements
- Save configuration
- System can track premium assignments
Temporary/Portable Stands
Scenario: Managing mobile or event-specific stands
Process:
- Create stand with descriptive name
- Check "Portable Stand" checkbox
- Note setup requirements in Details
- Assign to appropriate zone
- Can be reassigned or removed easily
- Flexibility for changing venue layouts
Best Practices
Naming Conventions
- Consistent Format: Use same pattern (e.g., "Stand##")
- Sequential Numbers: Keep logical order
- Descriptive: Include location hint if helpful
- Unique: Each stand name distinct
- Avoid Special Characters: Keep simple
Zone Organization
- Logical Grouping: Group by physical proximity or function
- Distinct Colors: Choose contrasting colors for visibility
- Meaningful Names: Use clear zone names
- Consistent Usage: Apply zones consistently
- Limited Zones: Don't over-complicate with too many zones
Default Groups
- Strategic Assignment: Assign groups based on expertise
- Balanced Distribution: Spread across available stands
- Not Always Required: Leave unassigned if flexible
- Update as Needed: Adjust based on experience
Details/Notes
- Clear Instructions: Write concise, helpful notes
- Special Requirements: Mention clearances, equipment needed
- Access Information: Note any access restrictions
- Contact Info: Include relevant contacts if needed
- Keep Updated: Maintain current information
Stand Flags
- Premium Stand: Use for actual premium areas only
- Portable Stand: Mark temporary or movable locations
- Consistent Criteria: Apply flags consistently
- Document Usage: Team should understand flag meanings
Troubleshooting
Cannot Create Stand
Problem: Save Stand button doesn't work
Possible Causes:
- Stand Name field empty
- Duplicate stand name
- Invalid zone color format
Solutions:
- Verify Stand Name filled
- Check for existing stand with same name
- Ensure zone color is 6-digit hex code
- Review error messages
- Try different stand name
Zone Color Not Displaying
Problem: Zone color doesn't show in table
Possible Causes:
- Invalid color code format
- Color code missing #
- Browser caching issue
Solutions:
- Enter 6-digit hex code without #
- Use standard format (e.g., "FF0000" for red)
- Refresh browser
- Re-edit and save stand
- Clear browser cache
Cannot Delete Stand
Problem: Delete button disabled or fails
Possible Causes:
- Positions assigned to members
- Stand in active schedules
- Historical references exist
Solutions:
- Check for assigned positions
- Remove member assignments first
- Reassign scheduled events
- Archive instead of delete
- Contact administrator
Bulk Operations Not Working
Problem: Bulk Positions or Bulk Stands fails
Possible Causes:
- File format incorrect
- Data validation errors
- Template not used
- Browser limitations
Solutions:
- Download and use provided template
- Verify data format matches requirements
- Check for error messages
- Import smaller batches
- Try different browser
Stands Count Incorrect
Problem: Stand count badge shows wrong number
Possible Causes:
- Deleted stands not refreshed
- Cache issue
- Filter active
Solutions:
- Refresh page
- Clear any active filters/search
- Close and reopen stands view
- Clear browser cache
- Count should match visible stands
Related Features
- Locations Overview - Main locations management
- Position Management - Configure positions within stands
- Schedule Management - Assign members to stands
- Teams Management - Group management for stand assignments
Tips
- Plan Layout: Map venue layout before creating stands
- Consistent Naming: Use sequential numbering (Stand1, Stand2, etc.)
- Zone Colors: Choose distinct, contrasting colors for easy identification
- Default Groups: Assign groups strategically based on expertise
- Details Field: Use for important notes about stand requirements
- Premium Flag: Mark VIP areas for special handling
- Portable Flag: Identify temporary or movable stands
- Bulk Operations: Use bulk features for large venues
- Position Planning: Define positions after creating stands
- Regular Review: Audit stand configuration periodically
- Test Assignments: Verify stand setup works with scheduling
- Document Zones: Keep record of zone purposes and assignments