Check-in Tab
Purpose
The Check-In tab allows organizers to track and record member arrivals at the event. It provides tools for checking in resources, viewing assignment details, verifying background checks, and managing unannounced check-ins for walk-up volunteers.
Route
/manage/schedules/{schedule-id}/check-in
Screenshot

Description
The Check-In tab provides a comprehensive interface for managing event attendance and verifying resources.
Header Summary
At the top of the page, three key metrics are displayed:
- 20 Need: Total number of resources expected (in gray)
- 0 Present: Number of resources currently checked in (in green)
- 20 No Show: Number of resources who haven't checked in (in red)
Action Buttons
- 🔄 Refresh: Refresh the resource list
- 👁 Include Signed: Toggle to show/hide resources who have already signed in
- 📋 Bulk Check-In: Check in multiple resources at once
Resource List
The main table displays all resources scheduled for the event:
Table Columns
- Resource: Name of the member/volunteer (sortable)
- Red text with ⚠ icon indicates "Do Not Return" status
- Regular text for approved members
- Group: The club or team the resource belongs to (sortable)
- Check-In: Eye icon (👁) to view/check in the resource
Special Indicators
- Names in red with warning icon indicate members with issues or restrictions
- Pagination controls at the bottom for navigating large lists
Resource Details Panel
Clicking the check-in icon opens a side panel with detailed information:
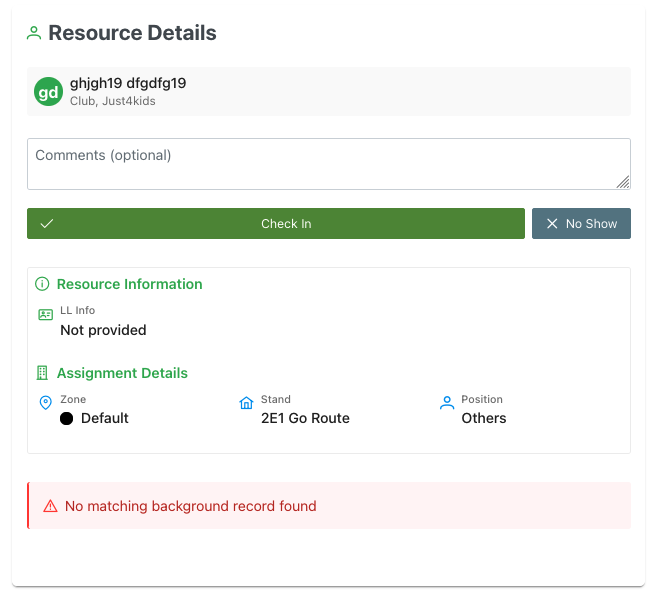
Resource Information
- Name and Avatar: Member's name with circular avatar/initials
- Club/Team: Organization affiliation
Comments Section
- Text area for adding optional notes about the check-in
- Useful for documenting late arrivals, special circumstances, or equipment issues
Action Buttons
- ✓ Check In: Green button to confirm the resource has arrived
- ✗ No Show: Gray button to mark as no-show if the resource doesn't arrive
Resource Information Section
- LL Info: Liquor License information
- Shows license number if provided (e.g., "V55555")
- Shows "Not provided" if no license on file
Assignment Details Section
- Zone: The zone assignment (e.g., "Default", "Support")
- Stand: The specific stand location (e.g., "2E1 Go Route", "Field Level Catering")
- Position: The role or position (e.g., "Others", "POS")
Background Check Status
Displays verification status for various background checks:
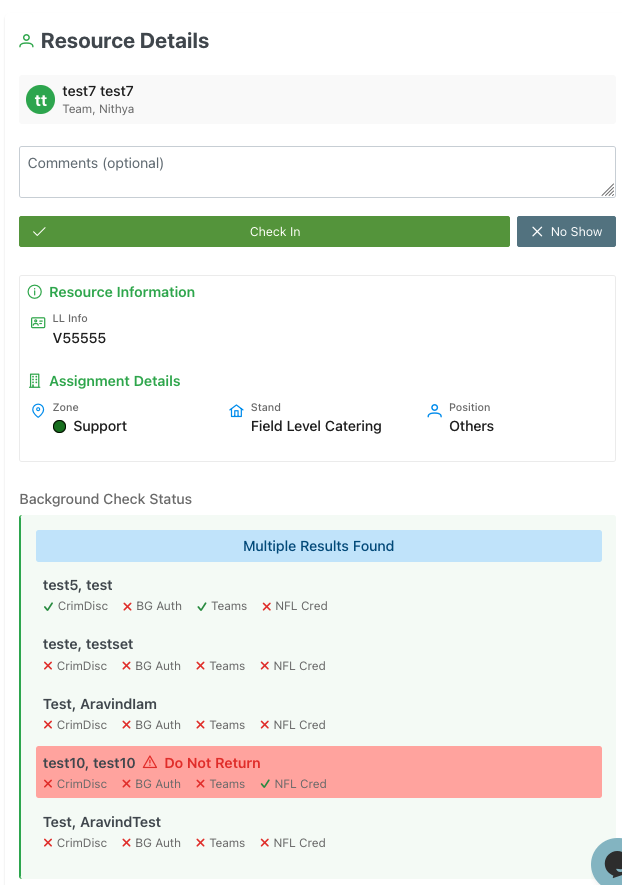
Status Indicators
- ✓ Green checkmark: Check passed
- ✗ Red X: Check failed or incomplete
Check Types
- CrimDisc: Criminal disclosure check
- BG Auth: Background authorization
- Teams: Team verification
- NFL Cred: NFL credentials (if applicable)
Special Cases
- No matching background record found: Red alert when no background check data exists
- Multiple Results Found: Blue banner when multiple background records match
- Lists all potential matches
- Shows status for each record
- Highlights critical issues (e.g., "Do Not Return" in red)
Unannounced Check-In
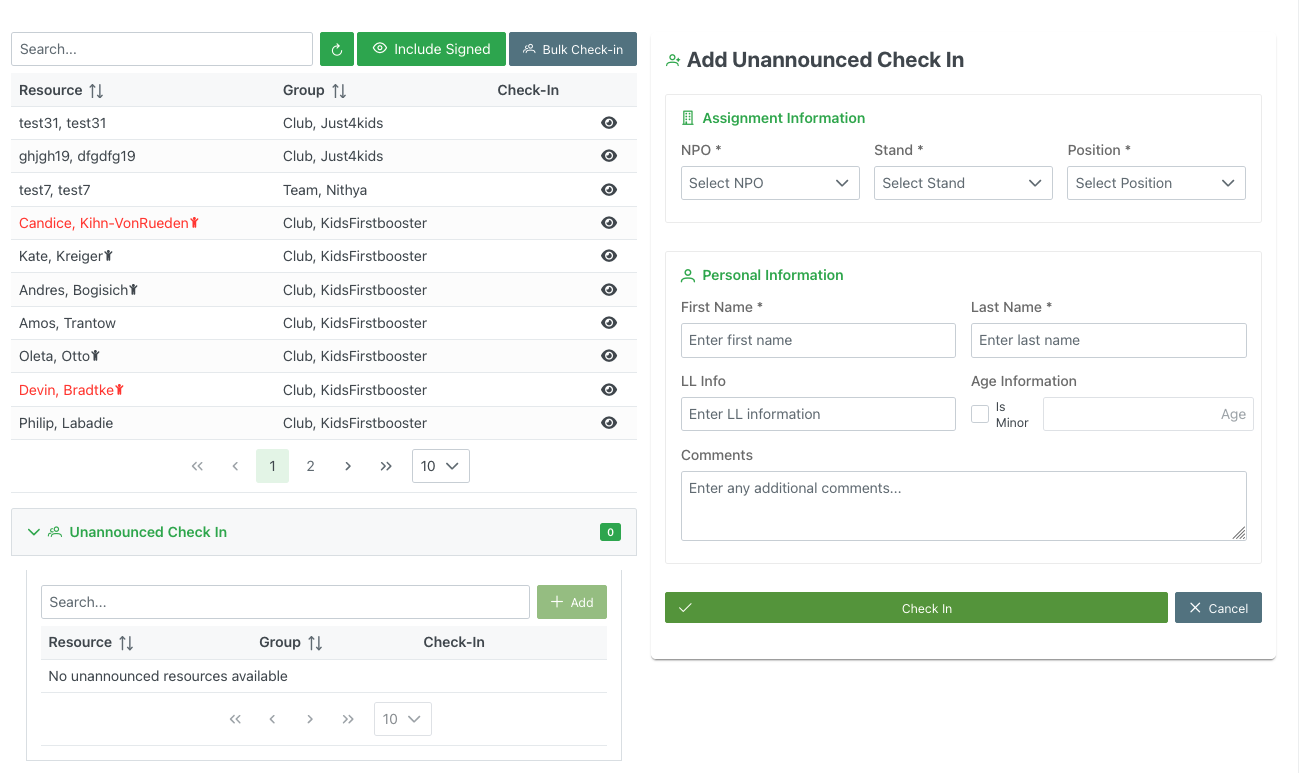
An expandable section at the bottom for handling walk-up volunteers not on the schedule:
Toggle Section
- "📥 Unannounced Check In": Expandable accordion with count badge (e.g., "0")
- Shows count of unannounced check-ins processed
When Expanded
If no unannounced resources yet:
- Shows "No unannounced resources available" message
- Search bar and "+ Add" button to add new resources
Add Unannounced Check-In Form
When adding a new unannounced volunteer, a form appears with:
Assignment Information
- NPO*: Dropdown to select the organization (required)
- "Select NPO" placeholder
- Stand*: Dropdown to select stand location (required)
- "Select Stand" placeholder
- Position*: Dropdown to select position/role (required)
- "Select Position" placeholder
Personal Information
- First Name*: Text input (required)
- Placeholder: "Enter first name"
- Last Name*: Text input (required)
- Placeholder: "Enter last name"
- LL Info: Liquor license information
- Placeholder: "Enter LL information"
- Age Information: Checkbox for "Is Minor" with age field
Comments
- Large text area for additional notes
- Placeholder: "Enter any additional comments..."
Actions
- ✓ Check In: Green button to complete the check-in
- ✗ Cancel: Gray button to cancel and close the form
Checked-In Resources
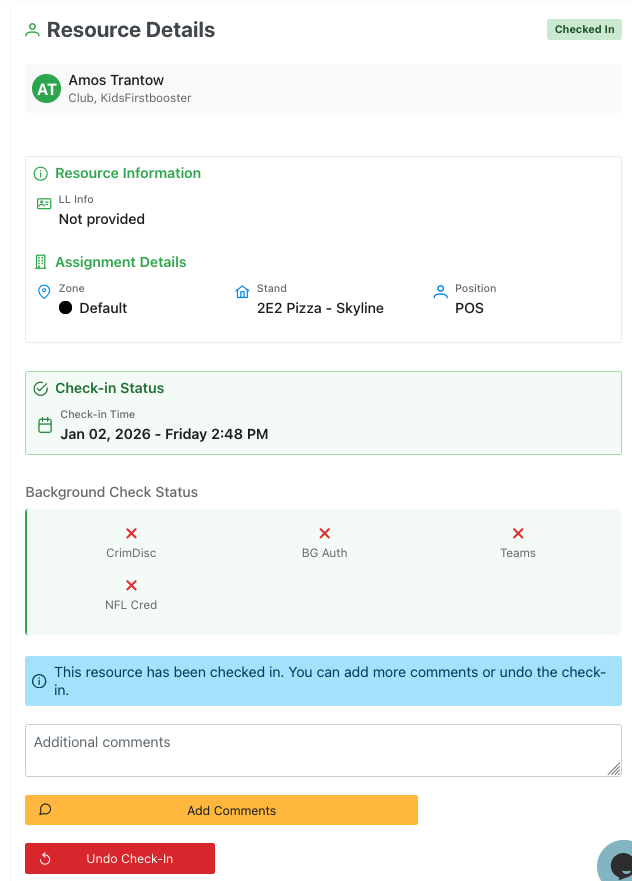
After a resource has been checked in, the panel displays additional information and options:
Status Badge
- "Checked In" badge displayed at the top right in green
Check-in Status Section
- Check-in Time: Shows the exact date and time the resource was checked in
- Example: "Jan 02, 2026 - Friday 2:48 PM"
- Calendar icon indicates the timestamp
Post Check-In Options
Information Banner
- Blue informational banner states: "This resource has been checked in. You can add more comments or undo the check-in."
Additional Comments
- Text area for adding more notes after the initial check-in
- Useful for documenting issues discovered during the event, equipment problems, or shift changes
Actions
- 💬 Add Comments: Orange button to save additional comments
- ↻ Undo Check-In: Red button to reverse the check-in if done in error
- Useful for accidental check-ins or if the wrong person was checked in
Use Cases
- Add notes about late arrivals or early departures
- Document equipment issues or uniform problems
- Record behavioral concerns or exceptional performance
- Correct accidental check-ins
Bulk Check-In
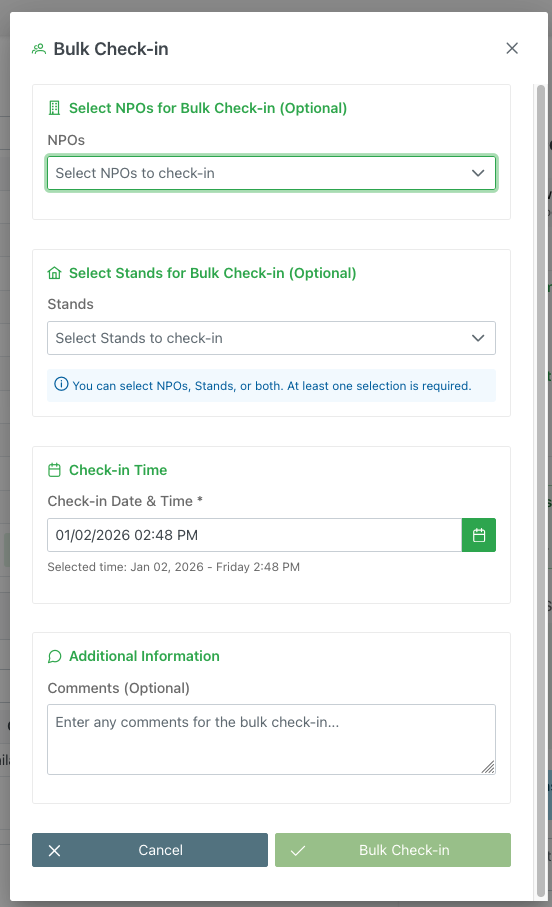
The Bulk Check-in feature allows organizers to check in multiple resources simultaneously based on NPO or Stand filters.
Opening Bulk Check-In
- Click the "📋 Bulk Check-in" button in the header action bar
Bulk Check-In Form
Select NPOs for Bulk Check-in (Optional)
- NPOs Dropdown: Multi-select dropdown to choose organizations
- Placeholder: "Select NPOs to check-in"
- Check in all resources from selected organizations at once
Select Stands for Bulk Check-in (Optional)
- Stands Dropdown: Multi-select dropdown to choose stand locations
- Placeholder: "Select Stands to check-in"
- Check in all resources assigned to selected stands
Selection Requirements
- Blue info banner: "You can select NPOs, Stands, or both. At least one selection is required."
- Flexible filtering allows checking in by organization, location, or combination
Check-in Time
- Check-in Date & Time*: DateTime picker (required)
- Shows current date/time by default
- Example: "01/02/2026 02:48 PM"
- Selected time display: Confirms the chosen timestamp
- Format: "Jan 02, 2026 - Friday 2:48 PM"
- Calendar icon button to open date/time picker
Additional Information
- Comments (Optional): Text area for bulk check-in notes
- Placeholder: "Enter any comments for the bulk check-in..."
- Applied to all resources in the bulk operation
- Useful for noting group arrival, bus delays, etc.
Actions
- ✗ Cancel: Gray button to close without checking in
- ✓ Bulk Check-in: Green button to confirm and process the bulk check-in
Use Cases
- Check in entire teams arriving together on a bus
- Process all resources at a specific stand location
- Handle mass arrivals at event start time
- Streamline check-in for large groups
Best Practices
- Verify the correct NPOs/Stands are selected before confirming
- Use comments to document group arrival circumstances
- Double-check the timestamp is accurate
- Consider individual check-ins if verifying IDs or credentials
Workflow
Standard Check-In Process
- Locate the resource in the list using search or scrolling
- Click the eye icon (👁) next to their name
- Review their assignment details and background check status
- Add optional comments if needed
- Click "Check In" to confirm arrival or "No Show" if they don't arrive
Post Check-In Management
- Click the eye icon (👁) next to a checked-in resource
- View the check-in timestamp and status
- (Optional) Add additional comments using the text area
- Click "Add Comments" to save new notes
- If needed, click "Undo Check-In" to reverse the check-in
Bulk Check-In Process
- Click the "📋 Bulk Check-in" button in the header
- Select NPOs and/or Stands from the dropdowns
- Verify the check-in date and time (adjust if needed)
- Add optional comments for the group
- Click "Bulk Check-in" to process all selected resources
Unannounced Check-In Process
- Expand the "Unannounced Check In" section
- Click "+ Add" to open the form
- Fill in assignment information (NPO, Stand, Position)
- Enter personal information (Name, LL Info, etc.)
- Add any relevant comments
- Click "Check In" to complete
The check-in data helps track attendance, manage no-shows, and provides an audit trail for event staffing.