Members Tab
Purpose
The Members tab allows you to manage all team members participating in a schedule. You can view member assignments, track spots and resources, monitor staffing progress, and manage member status from subscription to allocation.
Route
/manage/schedules/{schedule-id}/members
Screenshot
Description
The Members tab provides comprehensive tools for managing event participation and tracking staffing progress.
Header Section
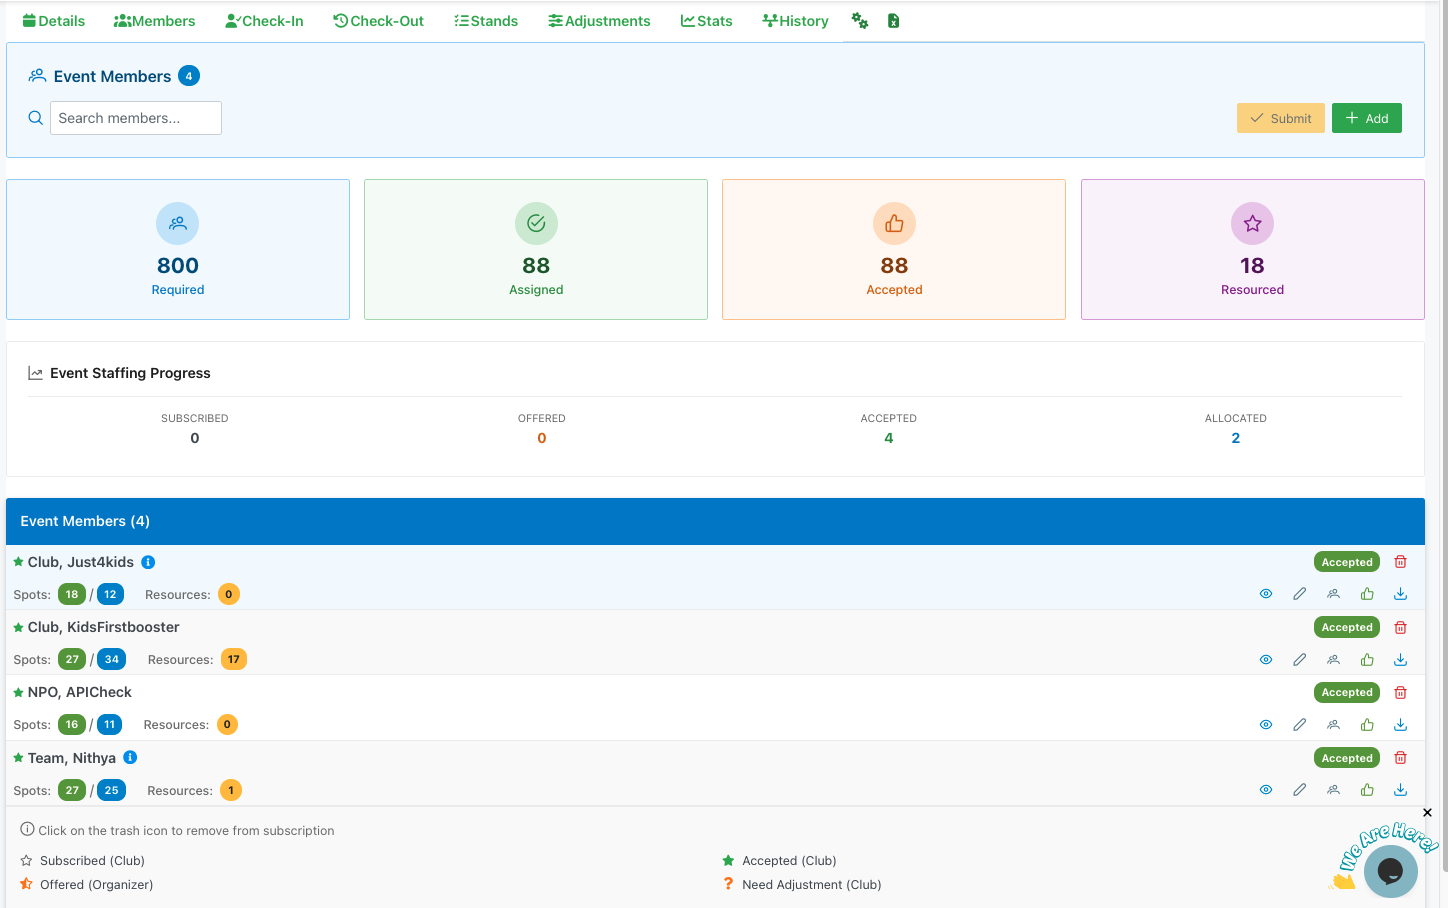
Event Members
- Displays the total count of members currently involved with the event
- Information icon (ℹ) provides additional context about member management
Search
- Search bar allows you to quickly find specific members by name, club, or team
Action Buttons
- Submit: Yellow button displays count of subscribed members ready for offer submission (e.g., "Submit (1)"). When clicked, sends assignment notifications to selected members/clubs via email. This creates an audit trail of who was offered which positions and when.
- Add: Green "+ Add" button to manually add new members to the event
📤 Submit Offer Confirmation
When clicking the Submit button, a confirmation dialog appears:
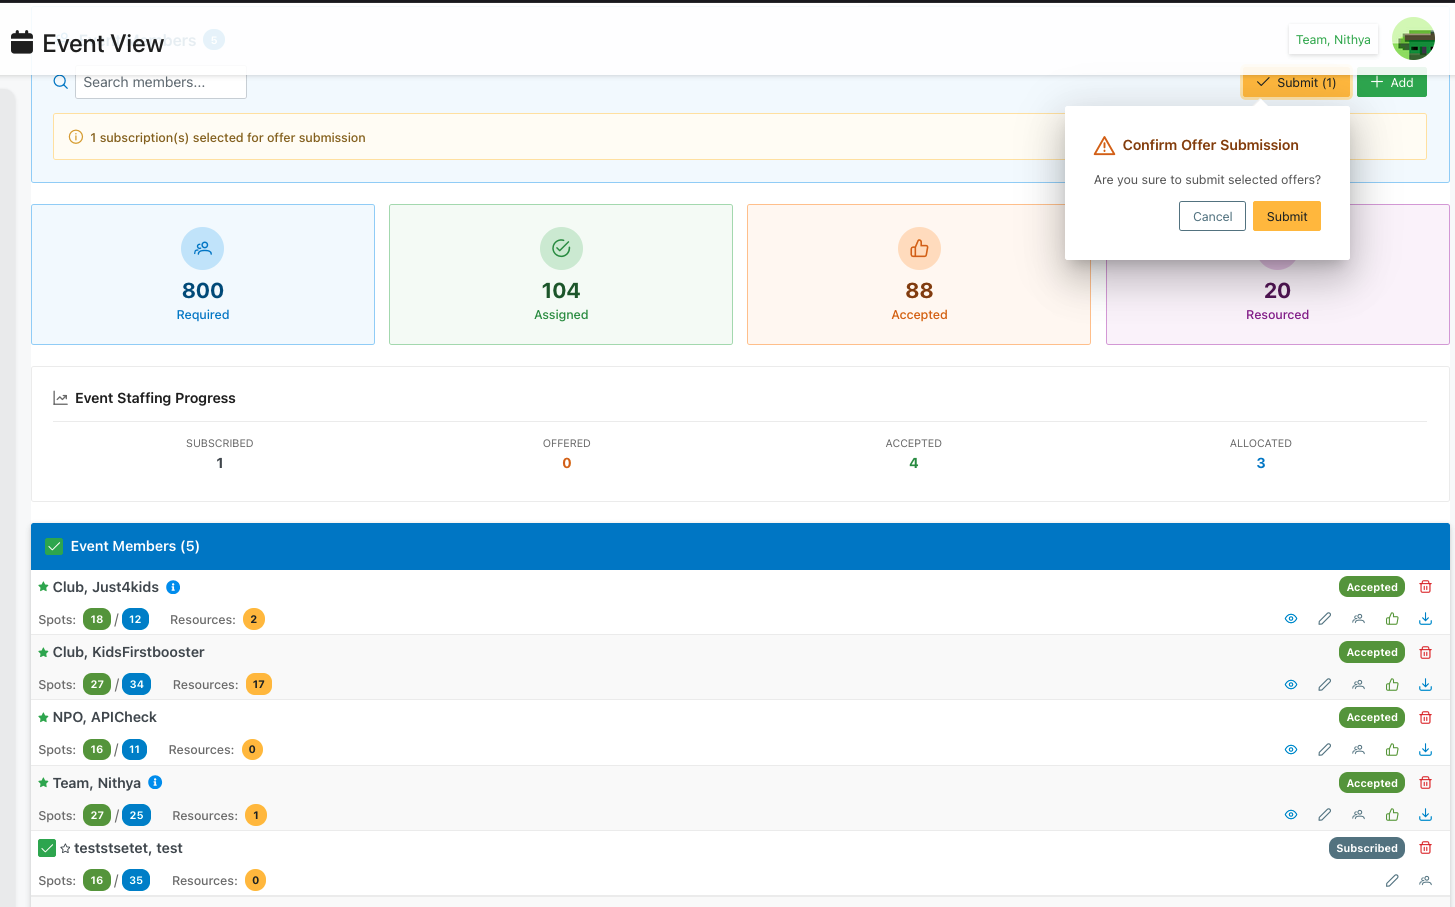
Confirmation Dialog
- Title: "Confirm Offer Submission" (with warning icon)
- Message: "Are you sure to submit selected offers?"
- Actions:
- Cancel: Close dialog without submitting
- Submit: Confirm and send assignment offers
What Happens on Submit
- System sends emails to all subscribed members/clubs with their stand and position assignments
- Members receive detailed information about:
- Which stands they're assigned to
- Specific positions within each stand
- Resource allocations (if applicable)
- Event date, time, and location details
- Creates an audit trail showing:
- Who was offered assignments
- When the offer was sent
- What positions were offered
- Updates the Event Staffing Progress tracker
- Changes member status from "Subscribed" to "Offered"
Best Practices
- Review all assignments carefully before submitting
- Ensure spot counts match expected allocations
- Verify resource assignments are complete
- Check that all subscribed members have appropriate stand/position assignments
➕ Add New Member
Clicking the green "+ Add" button in the header opens the "Add New Member" modal for manually adding members to the event:
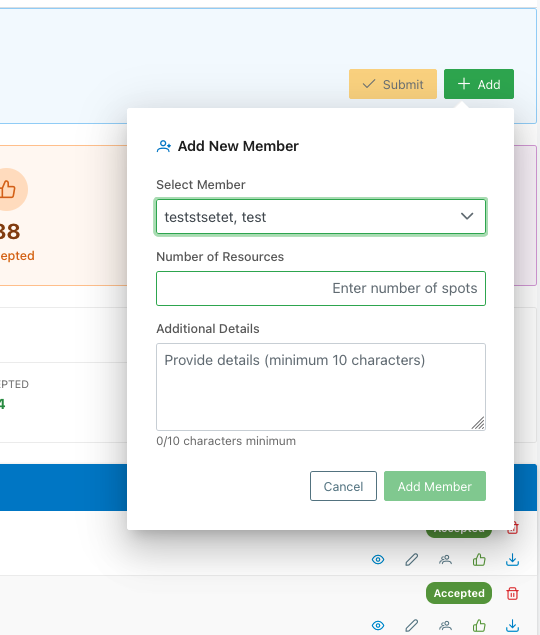
Form Fields
Select Member
- Dropdown to search and select a member/club to add to the event
- Shows member name in the dropdown (e.g., "testtsetet, test")
- Includes search functionality to quickly find members
Number of Resources
- Input field to specify how many resource spots this member needs
- Placeholder text: "Enter number of spots"
- Determines the allocation for this member
Additional Details
- Text area for providing context or notes about this member's participation
- Minimum requirement: 10 characters
- Character counter displays current count vs. minimum (e.g., "0/10 characters minimum")
- Placeholder: "Provide details (minimum 10 characters)"
- Useful for noting special requirements, preferences, or arrangements
Actions
- Cancel: Close the modal without adding the member
- Add Member: Save and add the member to the event with specified details (green button)
Workflow
- Click the "+ Add" button in the Members tab header
- Select the member/club from the dropdown
- Enter the number of resource spots needed
- Provide additional details (minimum 10 characters)
- Click "Add Member" to confirm
After adding, the member will appear in the Event Members List and can be assigned to specific stands and positions.
Summary Statistics
Four key metrics are displayed in card format:
Required (Blue Card)
- Shows the total number of positions needed for the event
- Icon: Person with plus sign
- Example: "800 Required"
Assigned (Green Card)
- Displays how many positions have been assigned to members
- Icon: Checkmark
- Example: "88 Assigned"
Accepted (Orange Card)
- Shows how many members have accepted their assignments
- Icon: Thumbs up
- Example: "88 Accepted"
Resourced (Purple Card)
- Indicates how many members have been fully resourced with materials/equipment
- Icon: Star
- Example: "18 Resourced"
Event Staffing Progress
A progress tracker showing the workflow stages:
- SUBSCRIBED: Members who have subscribed to receive notifications (shown as 0)
- OFFERED: Positions that have been offered to members (shown as 0)
- ACCEPTED: Members who have accepted their assignments (shown as 4)
- ALLOCATED: Members who have been allocated to specific positions (shown as 2)
Event Members List
A detailed list of all participating members with the following information for each:
Member Entry
Each member row displays:
- Club/Team Name: With a star (★) icon indicating subscription status
- Spots Badge: Shows assigned spots in green circles (e.g., "11" and "23")
- Resources Badge: Shows assigned resources in orange circles (e.g., "0", "17", "1")
- Status: Green "Accepted" badge indicating member has accepted the assignment
- Action Icons (right side):
- 👁 View quick member stand/position assignments
- ✏️ Edit member assignments
- 🔧 View/Edit resources assigned and edit for the member as admin
- 👍 View allocations for the stands/positions
- 📥 Download member resource allocations with QR code
- 🗑️ Unsubscribe the member from event (trash icon)
Member Action Details
👁 View Stand Assignments
Opens a side panel displaying all stand assignments for the selected member:
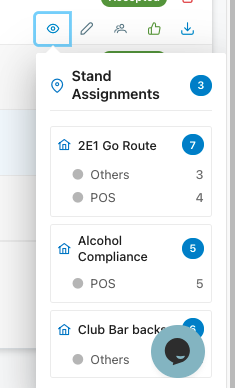
- Stand Assignments: Header shows the total number of stands assigned
- Stand List: Each stand displays:
- Stand name and icon
- Position types (Others, POS, etc.) with their counts
- Total positions allocated to the stand
- Provides a quick overview of where the member is assigned without opening the full modal
✏️ Edit Member Assignments (Assign Stands)
Opens the "Assign Stands" modal for managing member stand assignments:
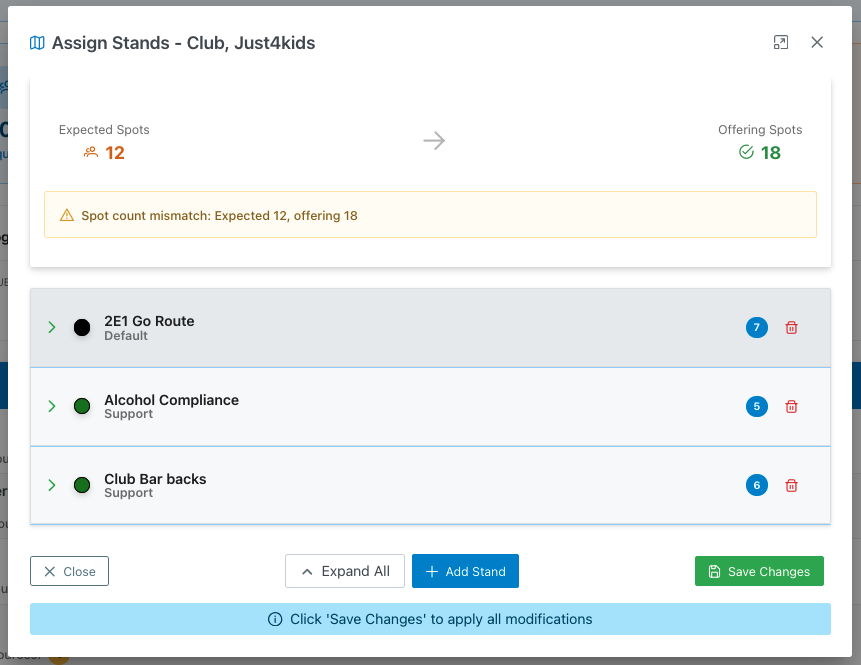
Spot Validation
- Expected Spots: Shows the number of positions the member is expected to fill (in orange)
- Offering Spots: Shows the total positions being offered across all stands (in green)
- Warning Alert: Displays a yellow warning banner when expected and offering spots don't match
- Example: "⚠ Spot count mismatch: Expected 12, offering 18"
Stand List Each assigned stand displays:
- Expandable arrow to view/edit details
- Stand name and type (Default, Support, etc.)
- Color-coded status indicator (black, green)
- Blue badge showing the number of positions for that stand
- Red trash icon to remove the stand
Actions
- Close: Close the modal without saving
- Expand All: Expand all stands to view their position details
- Add Stand: Add a new stand to the member's assignments
- Save Changes: Apply all modifications
- Info Banner: Reminder to click 'Save Changes' to apply modifications
Adding a New Stand
When clicking "Add Stand", a new stand entry appears:
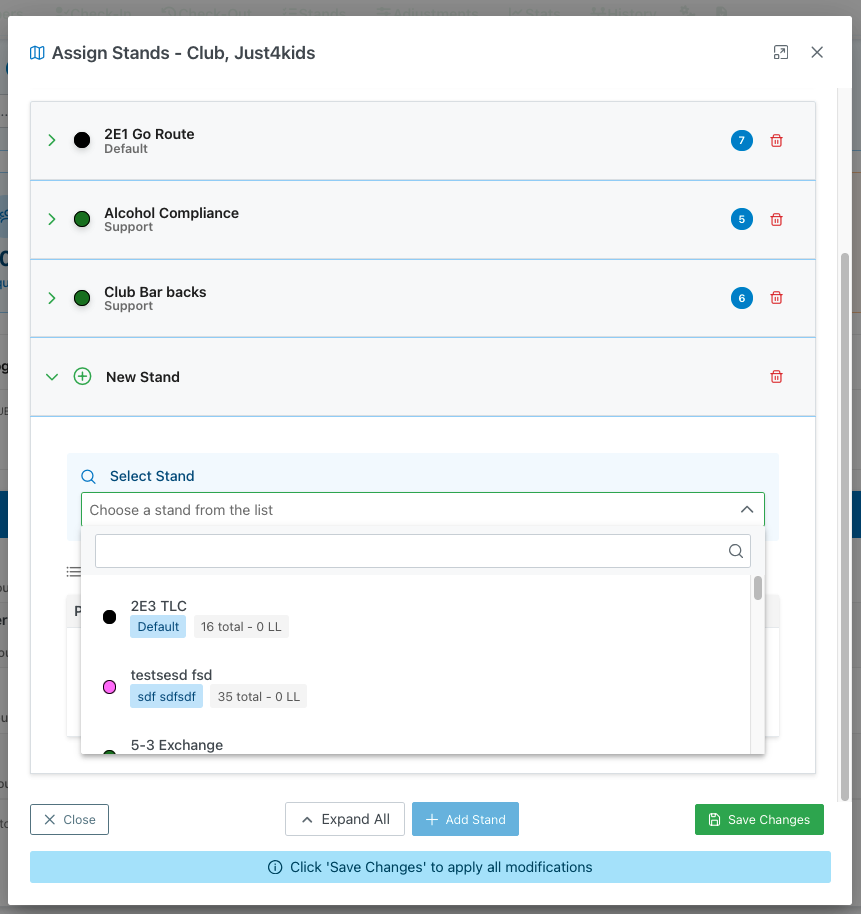
New Stand Row
- Dropdown icon: Expand/collapse the stand details
- Info icon: "New Stand" indicator
- Select Stand Dropdown: Choose from available stands
- Search functionality to filter stands
- Each option shows:
- Stand name
- Stand type badge (Default, Support, etc.)
- Total positions and LL (Liquior License) count
- Example: "ZE3 TLC - Default - 16 total - 0 LL"
- Red trash icon to cancel adding the stand
Configuring Stand Details
When a stand is expanded, detailed configuration options appear:
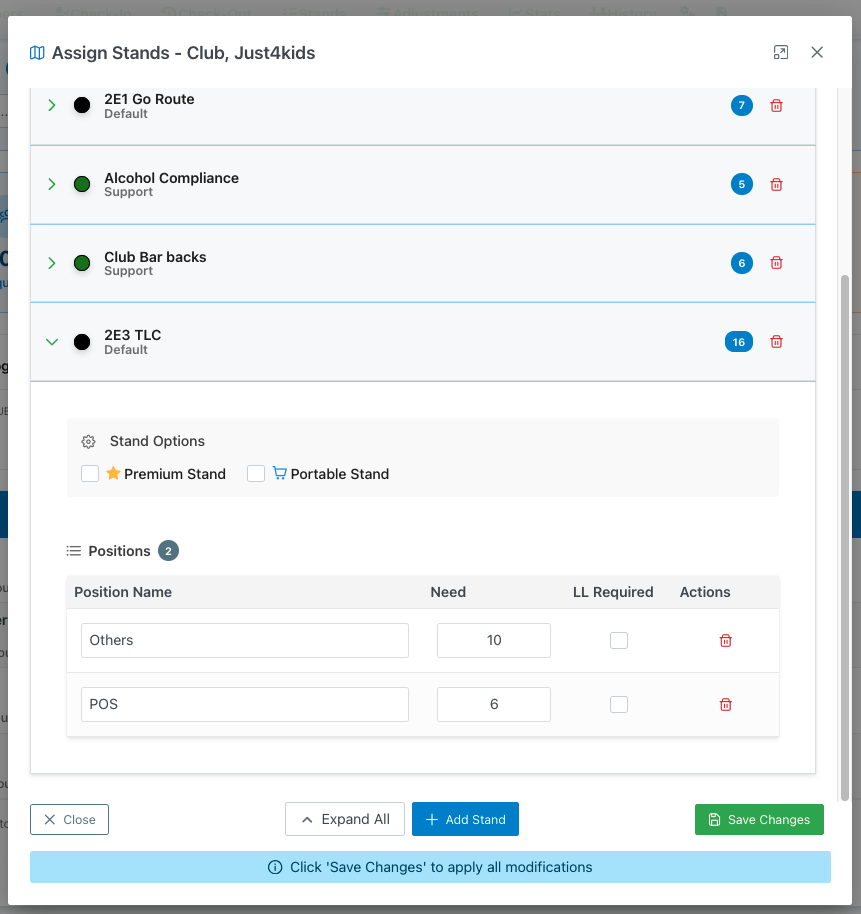
Stand Options
- ⭐ Premium Stand: Checkbox to mark as a premium/priority stand
- 🛒 Portable Stand: Checkbox to indicate if the stand is movable/portable
Positions Table A table for configuring positions within the stand:
- Position Name: Name of the role (e.g., "Others", "POS")
- Need: Number of people needed for this position (editable)
- LL Required: Checkbox to indicate if Liquior License requirement is mandatory
- Actions: Red trash icon to remove the position
- Positions Header: Shows the total count of position types (e.g., "Positions 2")
Bottom Actions
- Same action buttons as the main modal (Close, Expand All, Add Stand, Save Changes)
- Info banner reminder to save changes
🔧 View/Edit Resources
Opens the "Resources" modal for managing resource assignments for the member:
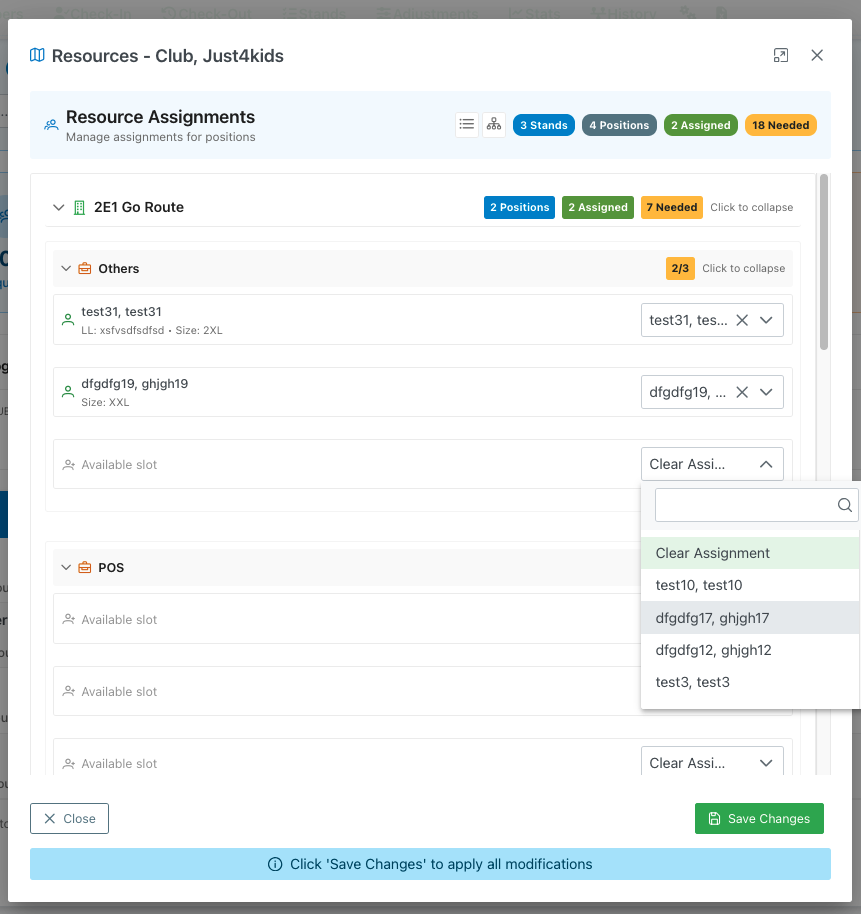
Summary Badges (Top right):
- 3 Stands: Total number of stands
- 4 Positions: Total positions with resource needs
- 2 Assigned: Number of resources currently assigned
- 18 Needed: Total resources still needed
Stand/Position Hierarchy
Each stand can be expanded to show its positions:
Stand Header
- Stand name with icon (e.g., "2E1 Go Route")
- Status badges showing positions, assignments, and needs
- Example: "2 Positions", "2 Assigned", "7 Needed"
- "Click to collapse" option
Position Details Each position within a stand displays:
- Position name (e.g., "Others", "POS")
- Fill status badge (e.g., "2/3" showing 2 filled out of 3 needed)
- "Click to collapse" option
Assigned Resources Table
- First Name: Member's first name
- Last Name: Member's last name
- LL Info: Liquor License information
- Size: T-shirt or uniform size (e.g., "2XL", "XXL")
Resource Assignment Interface
For each position, you can:
- View currently assigned members with their details
- See available slots that need to be filled
- Assign new members from dropdown menu:
- Shows "Available slot" for empty positions
- "Clear Assignment" dropdown option
- Search functionality to find members
- Each member option shows full name
- Remove assignments using the "X" icon
Actions
- Close: Exit without saving changes
- Save Changes: Apply all resource assignment modifications
- Info Banner: Reminder to click 'Save Changes' to apply modifications
👍 View Allocations
Opens the "Allocations" modal displaying a read-only view of all stand positions and resource assignments:
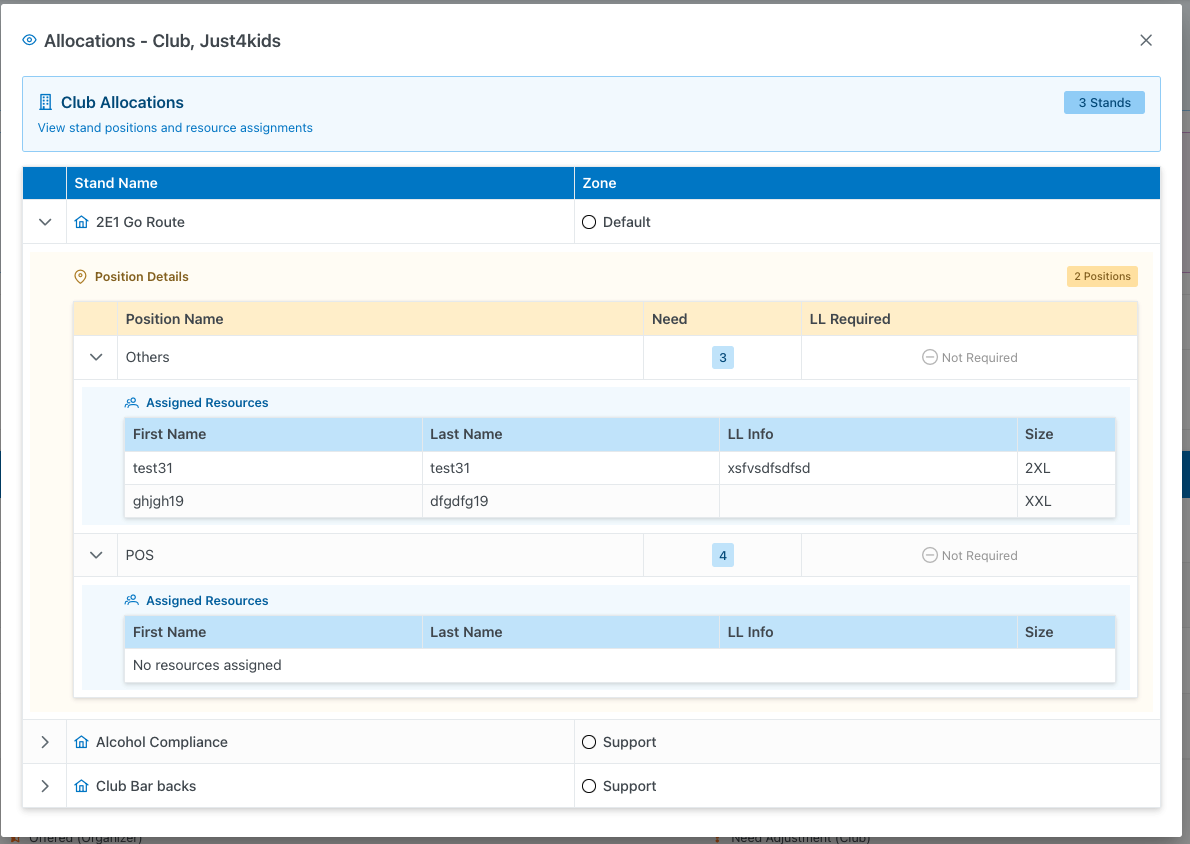
Header
- Club Allocations: Title indicating this is an allocation overview
- 3 Stands: Badge showing total number of stands assigned
- Subtitle: "View stand positions and resource assignments"
Allocations Table
The main table displays all stands with expandable details:
Table Columns
- Stand Name: Name and icon of the stand (e.g., "2E1 Go Route")
- Zone: Zone classification (e.g., "Default", "Support")
Expandable Stand Details
When a stand is expanded, it shows:
Position Details Section
- Yellow header: "Position Details" with position count (e.g., "2 Positions")
- Table with columns:
- Position Name: Role name (e.g., "Others", "POS")
- Need: Number of people needed (blue badge)
- LL Required: Liquor License requirement status ("Not Required")
Assigned Resources Table
- Blue header: "Assigned Resources"
- Shows members allocated to each position:
- First Name: Member's first name
- Last Name: Member's last name
- LL Info: Liquor License details
- Size: Clothing size
- If no resources assigned: "No resources assigned" message
Collapsed Stands
- Shows just the stand name, icon, and zone
- Arrow icon (>) to expand for details
Purpose
- Provides a comprehensive overview of all allocations
- Useful for reviewing assignments before publishing
- Read-only view for quick reference without editing
Legend
At the bottom of the page, a legend explains the icon meanings:
- ℹ️ Icon: Click on the trash icon to remove from subscription
- 🔵 Icon with "Subscribed (Club)": Member has subscribed to the event
- 🟡 Icon with "Offered (Organizer)": Position has been offered by organizer
- 🟢 Icon with "Accepted (Club)": Member/club has accepted the assignment
- 🔴 Icon with "Need Adjustment (Club)": Assignment requires adjustment